


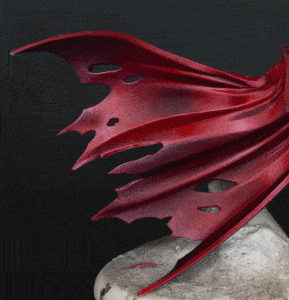
Learn how to paint the cloak for Abraxia, the latest in my series for how to paint Abraxia from the Slaves to Darkness army. In this video I use a slightly different technique to how I have previously painted cloaks, to give a stronger red with a slightly shiny finish, making the cloak red particularly strong.
Video: How to Paint the Cloak for Abraxia
Paints Used
Games Workshop Paints: Khorne Red, Evil Sunz Scarlet, Barak-Nar Burgundy
Vallejo Paints: Old Rose, Ice Yellow
Brushes
- Artis Opus: Various sizes including a size 1 and larger for blending, but any high-quality brush of a similar size is great.
Other Materials
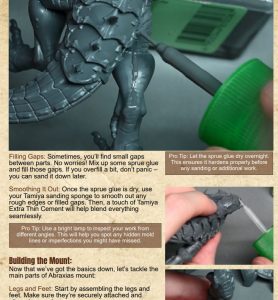
- Tamiya sanding pads (for smoothing out any imperfections or rough patches in the paint)
- Wet palette
- Airbrush (optional)
- Scalpel (for cleanup of the miniature before painting)
How to Paint the Cloak
Step 1: Airbrushing the Base Coat (Optional):
- Prime: Start with a white primer.
- Base Coat: Apply a few thin coats of Khorne Red using your airbrush.
- Highlight: Lightly dust the raised areas with white from a top-down angle.
- Midtone: Airbrush Evil Sunz Scarlet, adding subtle tonal variation.
- Shadow: Tilt the model back and airbrush Barak-Nar Burgundy on downward-facing areas.
Note: This airbrushing step is optional. If you prefer, you can achieve a similar base by painting Khorne Red directly onto a black undercoat.
Step 2: Hand-Painting Highlights and Shadows:
Wet Palette: Prepare a wet palette with the following colours:
- Evil Sunz Scarlet
- Evil Sunz Scarlet mixed with Old Rose
- Old Rose
- Old Rose mixed with Ice Yellow
- Ice Yellow
- Evil Sunz Scarlet mixed with Barak-Nar Burgundy (various ratios)
- Barak-Nar Burgundy
- Highlighting: Use a size 1 brush (or larger) to apply highlights with Evil Sunz Scarlet mixed with a small amount of Old Rose. Follow the natural curves and contours of the cloak, focusing on areas where light would naturally fall.
- Blocking in Shadows: Use Khorne Red (or a mix of Khorne Red and Barak-Nar Burgundy) to block in shadow areas. Don’t worry about perfect blending at this stage; focus on establishing tonal contrast.
- Refining Transitions: Switch to a larger brush (size 2 or 3) for smoother blending. Use a pulling motion, dragging the paint from the highlights into the shadows.
- Glazing: Thin your paints with water (4-5 parts water to 1 part paint) and apply glazes to smooth out transitions and unify the colours.
Step 3: Adding Weathering and Texture:
- Thinned Paints: Use a 1:1 ratio of paint to water for texture.
- Fraying: With a fine brush, apply short, feathery strokes of a slightly lighter, desaturated red (e.g., Barak-Nar Burgundy mixed with Khorne Red and Old Rose) to the edges of the cloak to simulate fraying.
- Scratches: Create fine scratches using the same desaturated red. Vary the direction and length of the scratches for a natural look.
- Refinement: Glazing can be used to soften harsh lines and create subtle variations in colour and texture.
Additional Tips:
- Use a lamp to identify natural highlights and shadows on the cloak.
- Don’t be afraid to experiment and personalise your weathering effects! Make her cloak unique to you and have fun.
By combining airbrushing and hand-painting techniques, you can achieve a rich, textured, and weathered satin cloak for your Abraxia miniature. The depth and vibrancy of the red will make your model stand out on the battlefield and in your display cabinet!
More Abraxia Tutorials
If you don’t have an account here on my website, please sign up here! I have over 350 video tutorials with steps and tips, plus a selection of PDFs. If you are not sure about joining, you can explore my free videos with a free membership, or take the plunge and become a full subscriber for full access.


If you’d prefer to support me on Patreon, please visit: https://www.patreon.com/RichardGray