


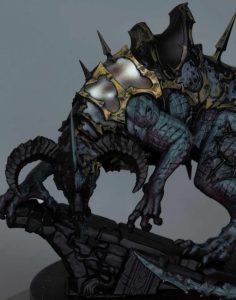
The latest video for Abraxia, this time looking at how to paint her head/skin, eyes and horns. The video also goes over some of the difficulties with this sculpt and the fact that I modified it.
Video: How to Paint the Abraxia Head
Paints Used
- Games Workshop:
- Rhinox Hide
- Mournfang Brown
- Balor Brown (Alternative to Tuskgor Fur)
- Evil Sunz Scarlet
- XV-88
- Morghast Bone
- Ushabti Bone
- Screaming Skull
- Vallejo:
- Model Colour Black
- Model Colour Ice Yellow
- P3:
- Morrow White
Brushes
- Artis Opus:
- Series M or S, Size 00 (for details and glazing)
Other Materials
- Sprue glue
- Tamiya Extra Thin Cement
- Wet palette
- Lamp (for highlighting)
- Blue Tac (for holding the miniature)
How to Paint the Abraxia Head
Step 1: Prep Work and Eye Basecoat
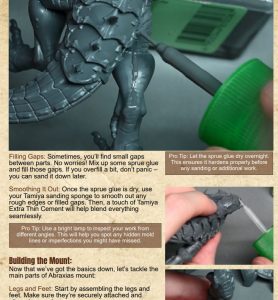
- Forehead Conversion: If desired, remove the protruding spike and fill it in for a smoother look. Use sprue glue and a touch of Tamiya Extra Thin to blend it seamlessly.
- Eye Basecoat: For the whites of the eyes, use a light yellow colour like Citadel’s Ice Yellow. Avoid pure white, as it won’t make the white dot “pop” later.
- Eye Challenges: Note the sculpted dots on the eyes, intended for glowing demon eyes. We’ll work around these to create a more human look. Scars running through the lower eyes will be addressed throughout the painting process.
Step 2: Skin Basecoat and Highlight Placement
- Skin Basecoat: Apply a generous coat of Mournfang Brown. Use a 1:1 ratio of paint to water for a smooth application.
- Over-Highlighting: Don’t just highlight the shiny spots under a lamp. Cover the majority of the head with Mournfang Brown to avoid high contrasts later.
- Light Direction: Consider the direction of the light source for your highlights. I’m working with a top-left angle, focusing highlights there but ensuring ample coverage on the right side as well.
Step 3: Skin Highlights
- Highlight Colours: Use a mix of Mournfang Brown with a tiny bit of Tuskgor Fur (or Ushabti Bone if you find Tuskgor Fur too grainy), gradually increasing the amount of Tuskgor Fur for lighter highlights.
- Blending: Carefully blend the highlight colours together, using a size z00 Artis Opus brush with a tiny amount of paint.
- Glazing: After highlighting, use watered-down Mournfang Brown (3-4 parts water to 1 part paint) and Rhinox Hide for glazing. This will smooth the transitions and enhance the shadows.
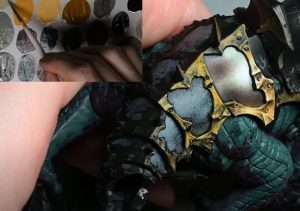
Step 4: Horns
- Horn Basecoat: Apply Mournfang Brown to the horns.
- Horn Highlight Colours: Use XV-88, Morghast Bone, Screaming Skull, and white to highlight the horns.
- Horn Gradient: Aim for a light-to-dark gradient, with the base of the horns being the lightest and the tips the darkest. You can achieve this through wet blending, applying the colours while the paint is still wet.
- Horn Texture: Use the tip of your brush to create a stippling or scratching effect for a textured look. Vary the strokes and avoid uniform patterns.
Step 5: Eyes and Lips
- Eye Refinement: Gradually fill in the scars on the lower eyes with the same light yellow used for the basecoat. Be patient and build up the layers for a smooth finish.
- Pupil: Paint a small white dot in the centre of each eye. Aim for similar size and shape for both eyes.
- Lip Colour: Leave the upper lip black, but paint the lower lip with a mix of Evil Sunz Scarlet and white. Use the lightest mix for the brightest highlights.
- Lip Details: Carefully define the shape of the lips with black paint, adding a slight highlight to the ridge below the nose. Add tiny lines on the sides of the mouth for added expression.
Step 6: Final Touches
- Makeup: Extend the black around the eyes to create a “tick” that goes up towards the temple on both sides.
- Refinement: Keep refining the highlights, shadows, and textures until you’re happy with the result.
This is a meticulous process, so take your time and enjoy it! If you have any questions or run into any trouble, don’t hesitate to ask in the comments below. Happy painting!
More Abraxia Tutorials

If you don’t have an account here on my website, please sign up here! I have over 350 video tutorials with steps and tips, plus a selection of PDFs. If you are not sure about joining, you can explore my free videos with a free membership, or take the plunge and become a full subscriber for full access.


If you’d prefer to support me on Patreon, please visit: https://www.patreon.com/RichardGray