


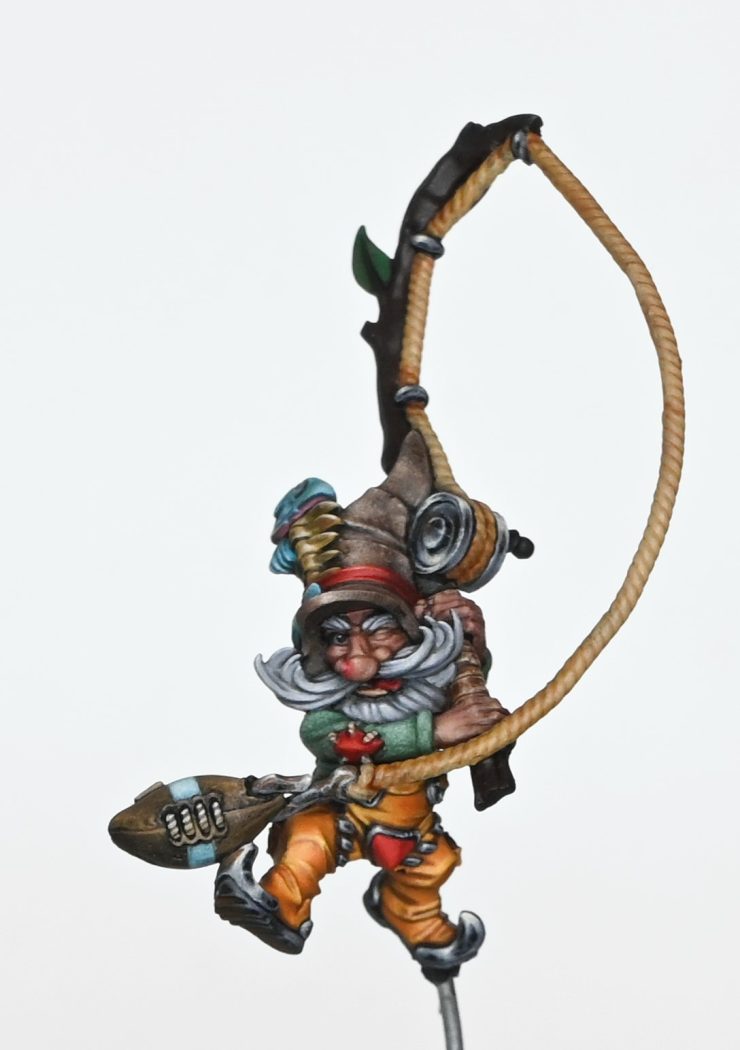
A small series on how to paint Rodney Roachbait, the new Blood Bowl star player for their Gnome team! In these videos we will explore lots of different textures and techniques a lot different to my usual moody and dark style. I hope you enjoy following along as much as I enjoyed painting him.
Video Part One: How to paint Rodney Roachbait – Base colours, skin, beard and jumper.
Although the model is painted to a high standard the techniques can still be used for tabletop gaming. This first part looks at preparing all of the base colours for the model, the skin, beard and jumper.
Materials List
Brushes:
Fine Detail Brush, Standard Brush, Drybrush – I use the Artis Opus range of brushes.
Paints:
Games Workshop: Rhinox Hide, Mournfang Brown, Bugman’s Glow, Cadian Fleshtone, Morghast Bone, Contrast Dark Oath Flesh, Sotek Green
Kimera Colours: Fallen Grass
White (or P3 Morrow White)
Sun Ray (or Vallejo Ice Yellow)
Vallejo: Neutral Grey
Other Materials: PVA Glue, Gloss Varnish, Magnifying Headset
Steps and Tips on How to Paint Rodney Roachbait
Preparation and Base Colour: I recommend using a headset to enhance visibility on this model as he is very, VERY small. I’ve based coated him black to begin.
Base Colour Application: Begin by applying a base colour to the entire model to avoid the prominence of black from the primer. Use Rhinox Hide to block in areas like the hat and the ball. However, upon closer inspection, I realised he wore waders instead of boots, so I switched to Mournfang Brown as the base colour for the waders to avoid excessive brown tones. Paint the strap holding the fish carcass onto the hat using Mournfang Brown. When painting resin models like this one, you may notice slight lines, but these are easily obscured with paint.
Addressing Imperfections: However, there are more pressing imperfections on this model – if you have some, like resin air bubbles, fill them with PVA glue and painting over. For the strap over the hat, use Fallen Grass from Chimera Colors. These paints are single-pigment, avoiding separation issues common with other paints. Mixing them with Games Workshop paints adds a satin finish to maintain colour vibrancy while avoiding using varnish, which can interfere with the model’s look.
Painting Specific Areas: For specific areas like the jumper, use Sotek Green for a matte finish, while the leather hat has a satin finish achieved by mixing in Games Workshop paints. Paint the fish head and tail using Sotek Green and Balthasar Gold for the bony parts.
Adding Depth: After basic block-ins, apply a thinned-down contrast paint, Dark Oath Flesh, over the model to give it a slight filter effect. This helps tie the colours together and softens harsh lines, especially on resin models with sharp details. Take care when using contrast paint, as it may pool in recesses, requiring careful cleanup. Once dry, it adds depth and subtle shading to the model.
Correcting Imperfections: Apply gloss varnish to smooth out any unwanted textures, like creases on the cheeks, providing a polished finish.
More tutorials for him to follow! In the mean time, why not explore my other videos?


If you don’t have an account here on my website, please sign up here! I have over 350 video tutorials with steps and tips, plus a selection of PDFs. If you are not sure about joining, you can explore my free videos with a free membership, or take the plunge and become a full subscriber for full access.


If you’d prefer to support me on Patreon, please visit: https://www.patreon.com/RichardGray