How to paint Mortarion Videos – Update!

Whilst painting I tried to get as much footage of the process as possible so I can teach you how to paint Mortarion, too. I have just finished getting these onto the website, so now you can watch everything from the demon eye wings, to the crusty rusty armour.

How to paint Mortarion

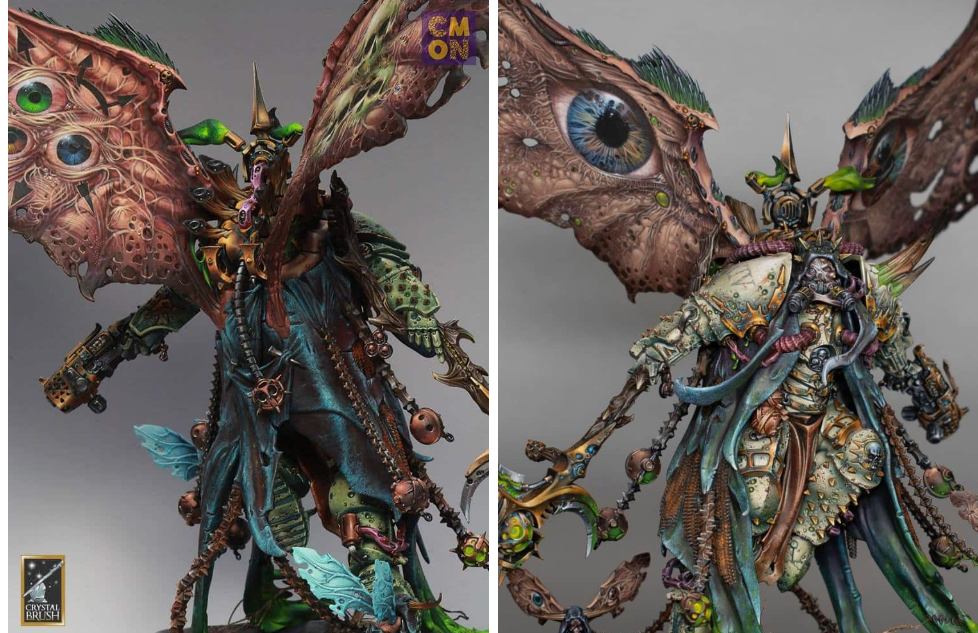
I began painting my Golden Demon winning Mortarion when the Mortarion model first came out, and only finished it just in time for the Crystal Brush.

It nearly broke me as it was such a difficult model to paint due to the massive amount of details and the difficulty in holding it without rubbing the paint off!

I’m so happy it’s finally done. I received a Gold Golden Demon in the Large Model category at Warhammer Fest 2019.

How to paint Mortarion

All stages of painting him are filmed in HD and available online on this website! Click below to view:

How to paint Mortarion – all tutorials

Mortarion Tutorials
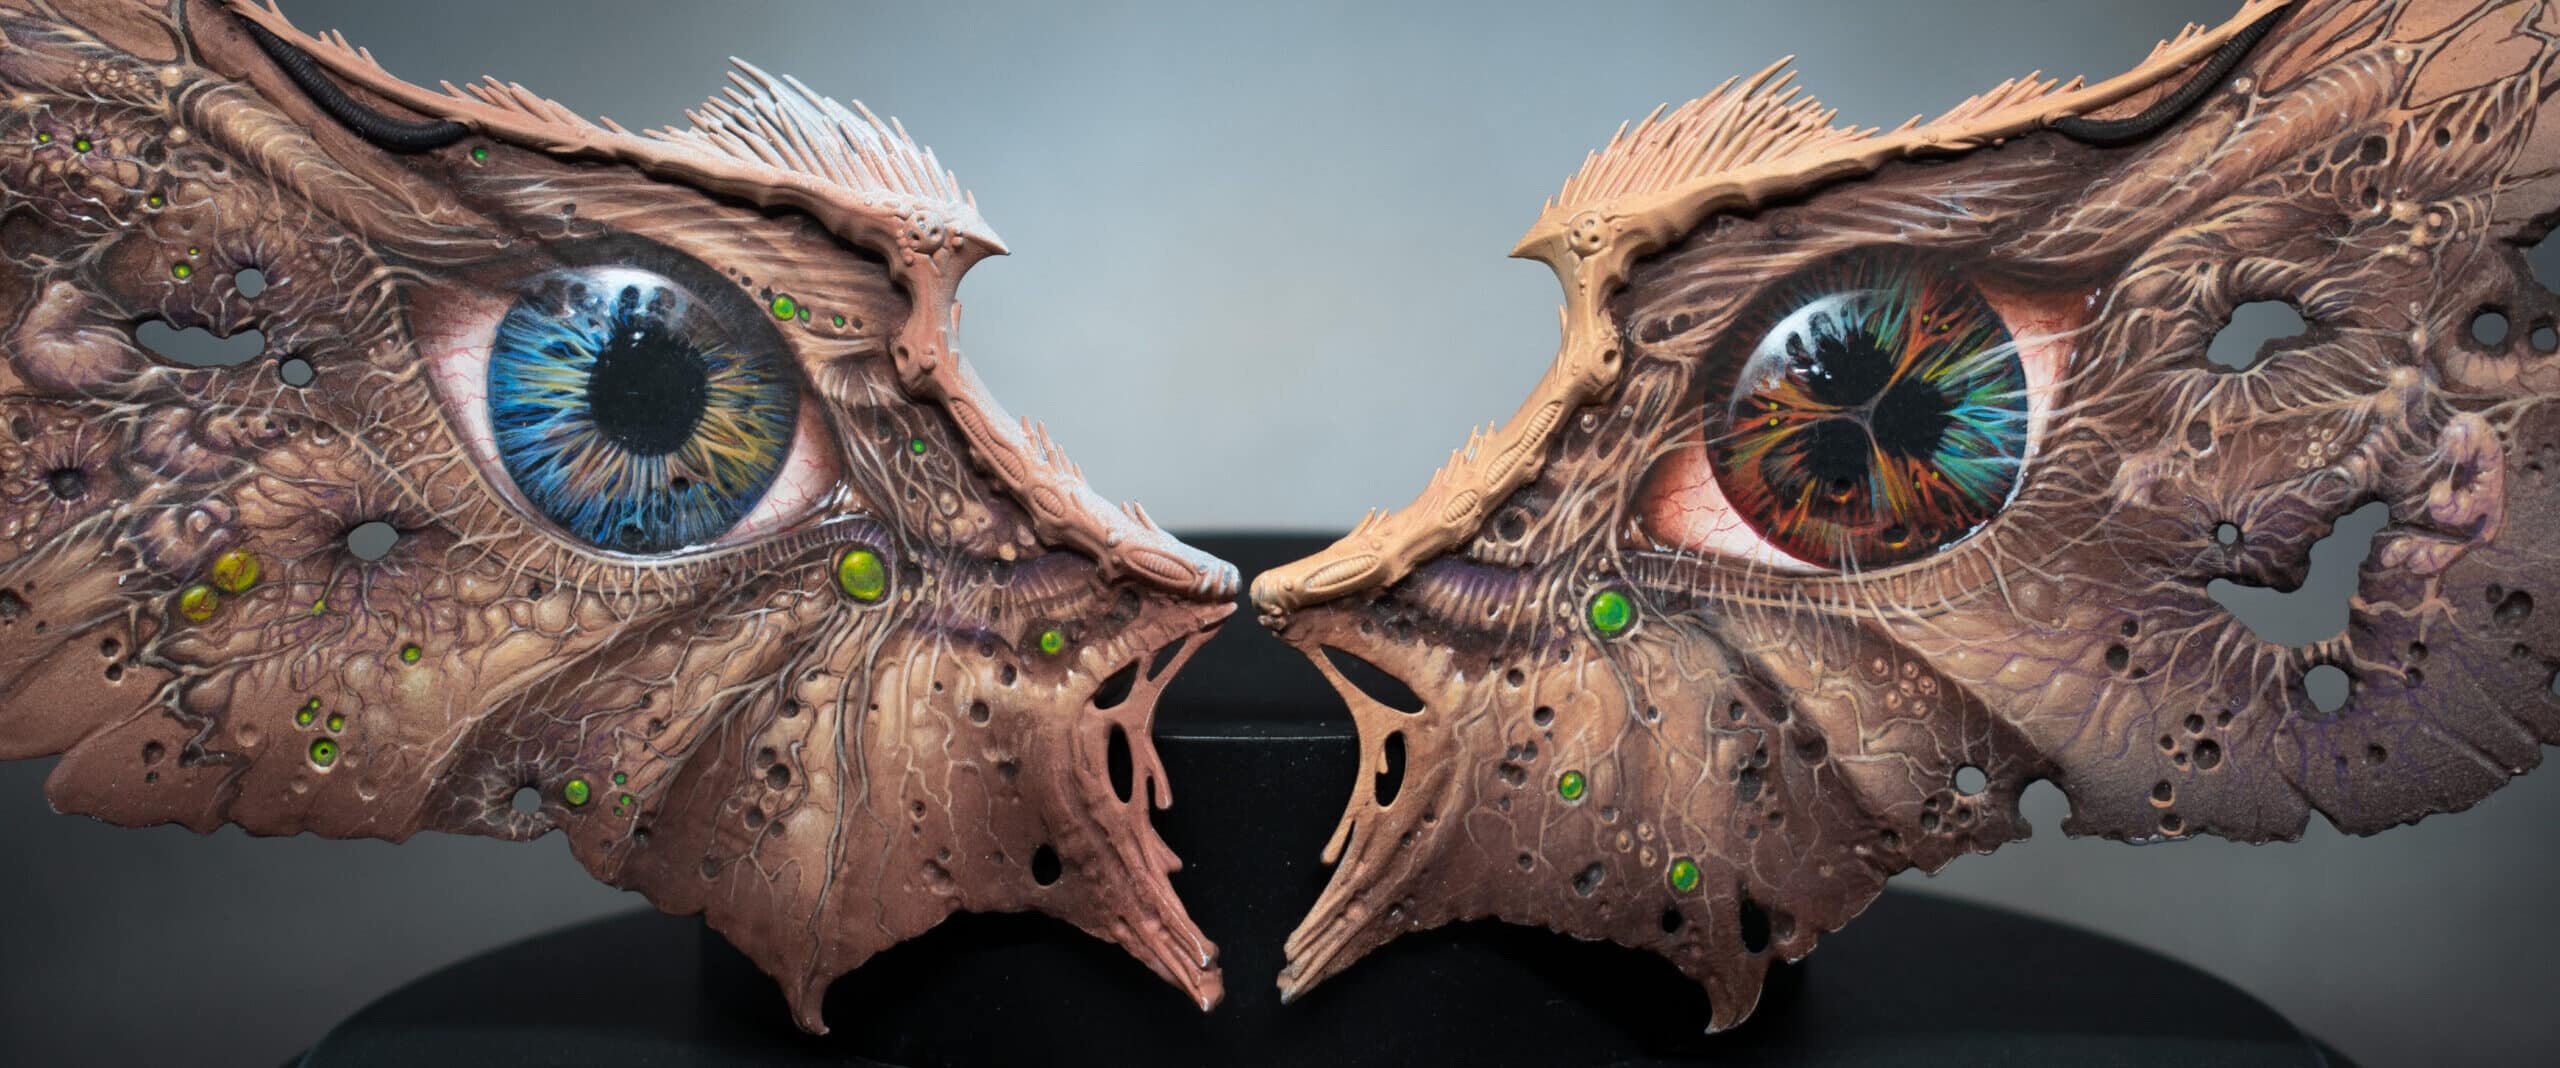
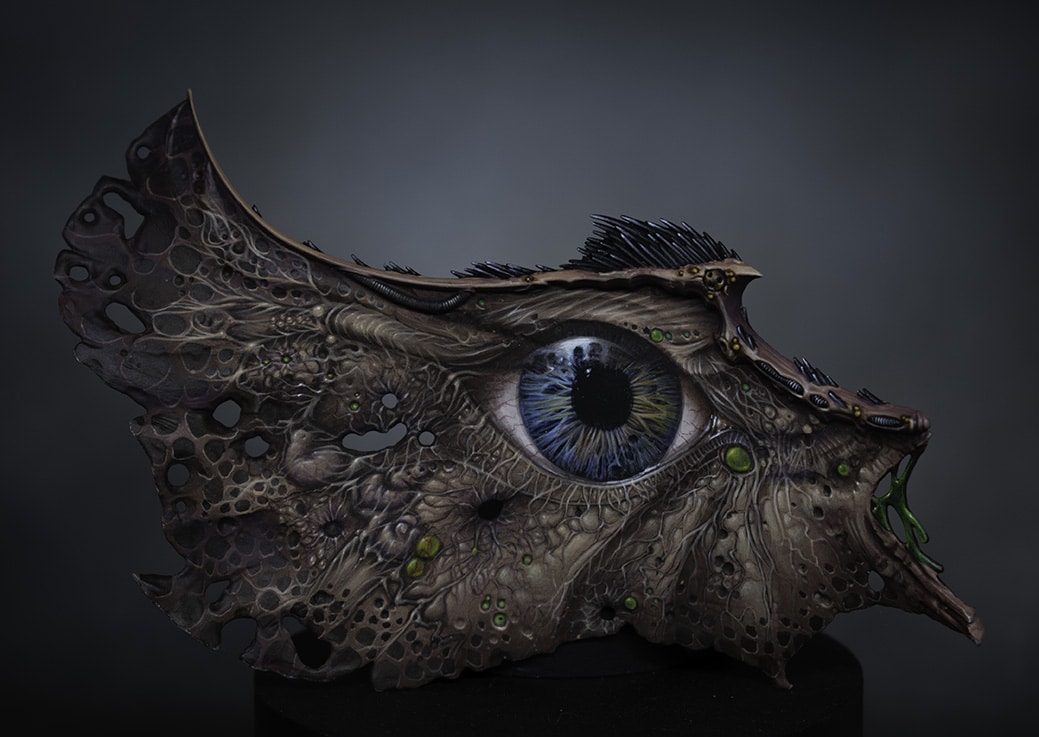
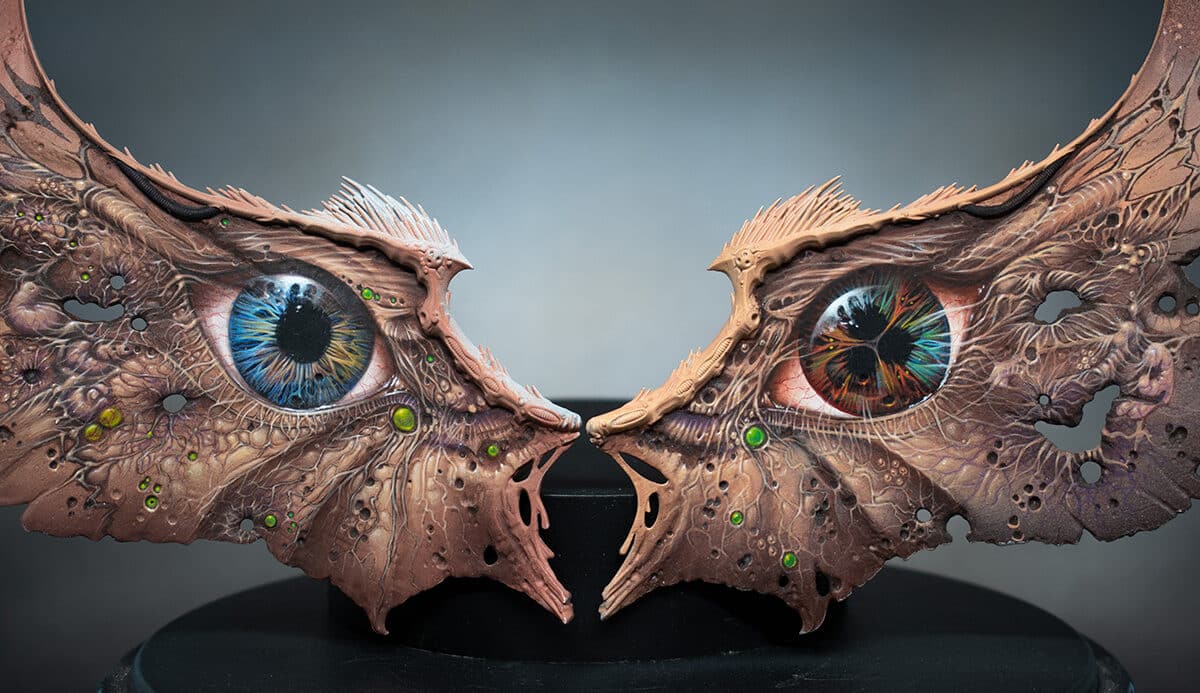
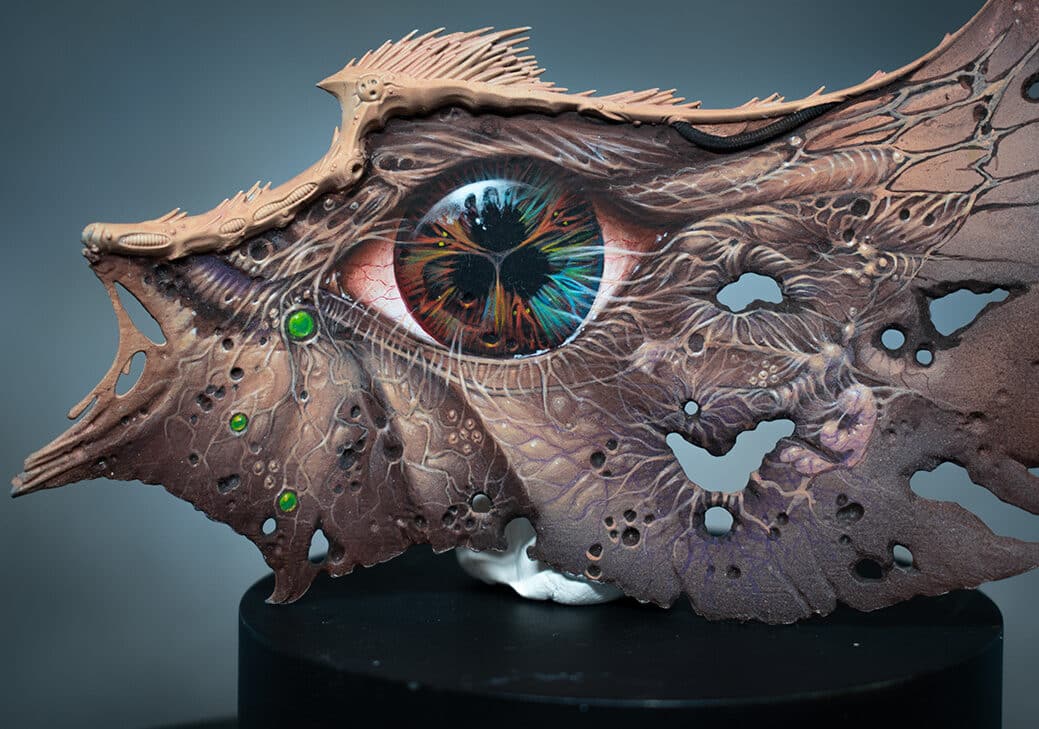
I’ve had a few requests for more photos of Mortarions Wings, alongside the video tutorials! The wings have two sets of patterns. On the front we have a set of eyes, one humanoid and one demon, along with creeping maggoty infested flesh and pustules (of course!) To Start… First up, I needed to clean and prep the wings. Originally the wings on the model has a lot of texture and raised areas, which I needed to remove in order to create a flat canvas. The wing before clean-up And after! A step-by step on how I did this, with all the tools is available at: Mortarion Wing Prep – PDF “There is no darkness to be found between the void of stars, nor the deepest pits of the earth that equals the darkness of Mankind’s deeds.“—Excerpt from the suppressed Neo-Terran Credos Then comes the painting! Website members can follow along with a set of videos at: Video Tutorials : Mortarions Wings The Eye on Mortarions Wings… The eyes represent the human and demon side of Mortarion, left his blue pre-Daemon prince eye, the right his corrupted version. The Reverse of Mortarions Wings The reverse of his wings show more corruption, with plenty of symbolism. And there you have it! You can follow along with my painting videos of the wings, plus videos on other parts of the Mortarion model with my commentary by clicking the links below. Thank you. Follow along with all my Mortarion Tutorials Free Video Tutorials Free videos for logged in members – just sign up as a ‘friend’ to view and click any of the thumbs.To explore all of these, visit this page! If you don’t have an account, please sign up here! The website currently has over 350 video tutorials, plus step by step guides and PDFs. You can explore more free videos with a free “freebies” membership, or take the plunge and become a full subscriber for full access. If you’d prefer to support me on Patreon, please visit: https://www.patreon.com/RichardGray [...]
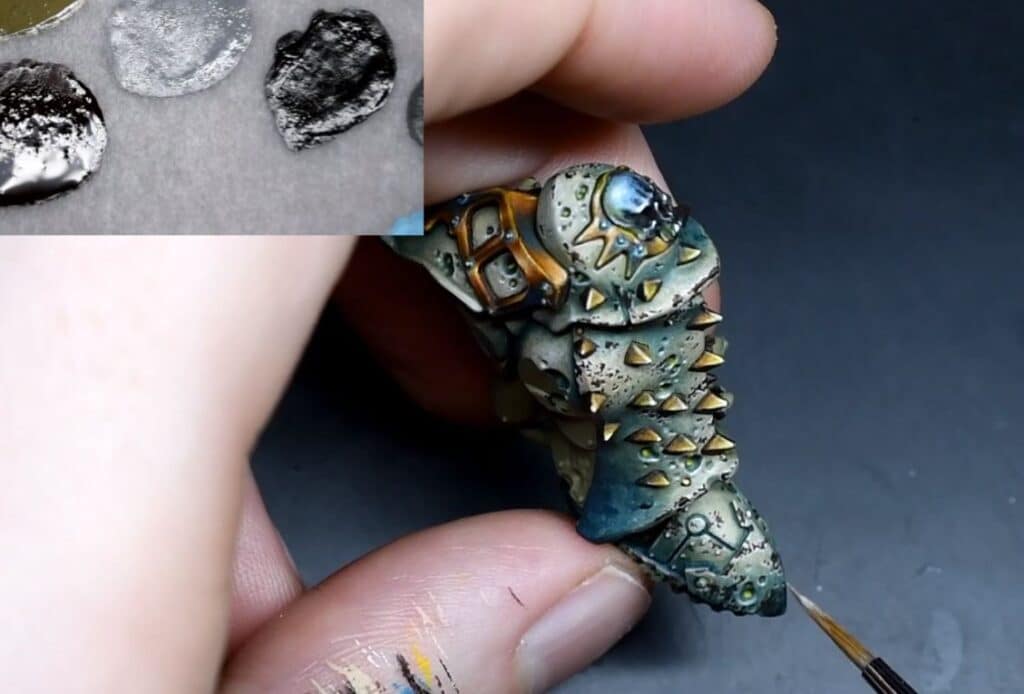
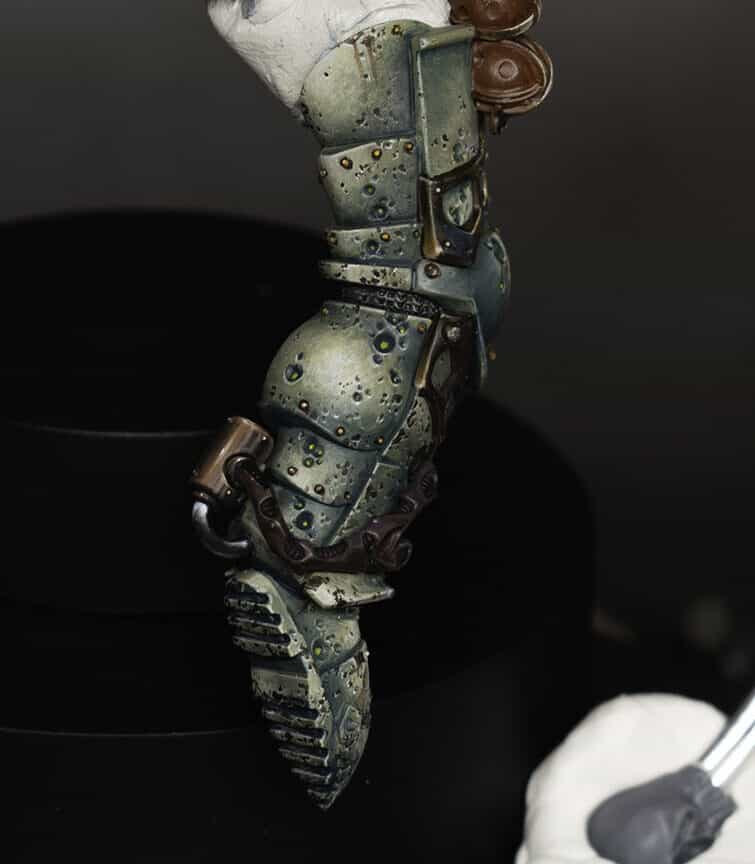
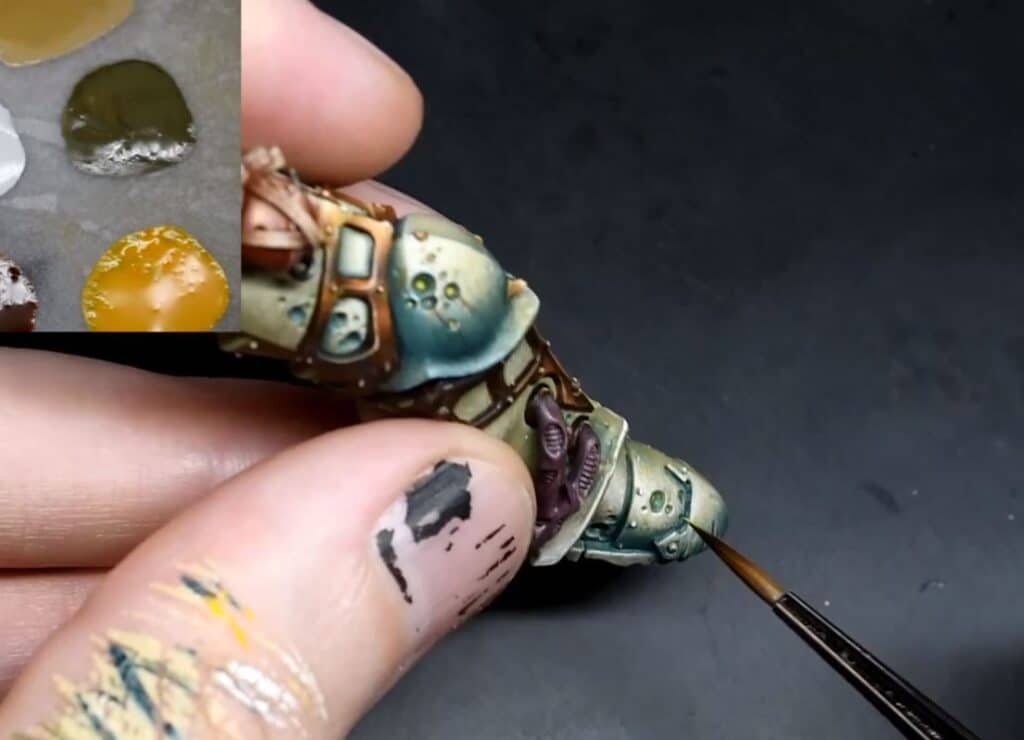
A series of videos on how to paint Mortarions green armour! Follow along with a paint guide, video and step-by-step instructions. My Mortarion won Gold in Golden Demon 2019. Quick note on the white paint I use – with Ceramite White not an option, apparently Corax White is the replacement, but really I don’t think it matters too much which white you use, eg Valleho white, Two Thin Coats, White Star etc! How to Paint Mortarions Green Armour: Basic colours and knee armour All videos are recorded in HD 1080p or higher – use full screen for the full effect and let the video load completely. The following paints were used: Games Workshop: Death Guard Green, Ushabti Bone, Ceramite White, Incubis Darkness. Step-by-step: How to Paint Mortarions Green Armour: Basic colours and knee armour Prepare Your Model: Ensure that the base colour (Death Guard green) has been sprayed onto the model. It can be applied using an airbrush or by hand painting.Shadow Bone Base Layer: Use a small brush to apply Ushabti Bone directly on top of the Death Guard green. Apply it roughly to create a textured and rough appearance.Use the side of the brush to avoid filling in details, especially in areas with corrosion or small holes.Directional Lighting: Maintain a consistent light source direction for the entire model. In this case, the lighting is from the top left.Use the side of the brush to catch the edges of details and create shadows where needed.Building Layers: Apply multiple layers of Ushabti Bone, allowing each layer to dry. This builds up texture and depth on the armour. The paint should be fairly watered-down to allow for a gradual transition and darker appearance upon drying.Ceramite White Highlights: Apply Ceramite White on top of Ushabti Bone, following the same process as before but in a reduced area. Highlight the sculpted details and the simple dark areas left by the previous layer.Fine Detailing: Use a small brush to add finer details, such as dimples and small marks, using both Ushabti Bone and Ceramite White. Take care with areas that will be hidden, as they can still be visible from certain angles.Shading with Incubis Darkness: Introduce Incubis Darkness for shading, especially in areas like the holes in the armour. Darken these areas to add contrast. Use the same directional lighting approach for shading.Gold Trim Consideration: Be mindful of the upcoming gold trim painting, as it will affect the surrounding painted areas.Final Details and Blending: Fine-tune details, especially in areas like the knee, ensuring that the lighting direction is consistent.Blend colours using a wet palette for a smoother transition between shades.Yellow Details: Consider using a yellow paint, such as Averland Sunset, for adding small details like dots in the centre of holes NMM (non metallic metal) armour trim The following paints were used: Games Workshop: Yriel Yellow, Rhinox Hide, Firedragon Bright, Troll Slayer Orange, Mournfang Brown Vallejo: Ice Yellow Step-by-step: How to Paint NMM (non metallic metal) armour trim Prepare Your Workspace: Set up your painting area with good lighting and ventilation.Gather your paints: Yriel Yellow, Rhinox Hide, Firedragon Bright, Troll Slayer Orange, Mournfang Brown, and Ice Yellow from Vallejo.Ensure you have a wet palette for smoother paint application.Have a variety of brushes ready, including a small fine-tip brush for detailed work.Base Coat with Firedragon Bright: Apply Firedragon Bright as the base coat for the non-metallic metal (NMM) effect. Use a wet palette to maintain the paint’s consistency.Focus on covering the areas designated for the metallic trim.Add Troll Slayer Orange for Vibrancy: Introduce Troll Slayer Orange to create a vibrant orange hue.Blend it with Firedragon Bright for a smooth transition.Adjust the intensity by adding more or less Troll Slayer Orange as needed.Create Initial Highlights with Ice Yellow: Utilise Ice Yellow to mark out initial highlight areas.Apply it generously, as it will be blended and softened later.Adjust based on the model’s position and where light would naturally hit.Blend and Soften Highlights: Blend the colours together using small marks and strokes.Use a wet palette to keep the paint workable.Pay attention to transitions and reflections, adjusting as necessary.Introduce Yriel Yellow for Brightness: Add Yriel Yellow for intense brightness.Be cautious not to overdo it; you can always layer and adjust later.Focus on the most prominent areas that catch the light.Tone Down with Mournfang Brown: Use Mournfang Brown to tone down the intensity of the yellow hues.Glaze over areas to create a subtle transition.Consider the reflective properties of metal for realistic effects.Adjust Highlights with White Scar: Apply White Scar to create sharp highlights.Concentrate on areas where light hits sharply.Use a fine-tip brush for precision.Evaluate and Make Adjustments: Assemble the model partially to evaluate how light interacts with the metallic trim.Identify areas that need adjustments, considering the model’s overall composition.Add Final Touches and Reflections: Fine-tune reflections and add small dots to simulate reflective points.Experiment with different angles to ensure the model looks realistic from various perspectives.Pay attention to contrast, emphasising dark areas next to light for a shiny effect. How to Paint Mortarions Green Armour: Details on the knee armour The following paints were used: Games Workshop: Death Guard Green Ushabti Bone Incubi Darkness Yriel Yellow Mournfang Brown P3: Morrow White (Ceramite White) Step-by-step: Paint Mortarions Green Armour: Details on the knee armour Prepare the Model: Ensure the model is clean and free of any dust or debris.Use an airbrush to apply Death Guard Green as the base colour evenly over the foot.Initial Highlights with Ushabti Bone: Use a sharp brush to apply Ushabti Bone roughly over the Death Guard Green. Apply the highlight at an angle to catch light on the curve of the foot.Brush Technique: Utilize a worn-out size 1 brush for a softer, larger mark.Take advantage of the worn tip to create fatter marks for a textured effect.Layering Highlights: Apply multiple layers of highlights, ensuring they align from toe to the top of the foot.Use Death Guard Green on the palette to create soft blends and transitions.Adding Depth with Incubi Darkness: Glaze or paint Incubi Darkness over the highlights for a dark, contrasting effect.Test visibility behind the cloak to determine areas worth spending time on.Refining Highlights with Morrow White (Ceramite White): Move on to a smaller area with white, refining the highlight points. Underline sculpted details to enhance their 3D appearance.Glazing and Opaque Effects: Apply a sloppy glaze of Incubi Darkness to create a wash-like effect.Be mindful of catching raised details; the goal is to maintain texture.Adjusting Glazes: Fine-tune glazes by adjusting the opacity and color on the palette.Experiment with different mixtures to achieve desired transitions.Fine Details: Use Morrow White (Ceramite White) or a preferred white paint for underlining details.Add an orange base color for a unique glow effect.Shadows and Depth: Introduce shadows with Incubi Darkness on the upper edges of textures.Add shadows to make 3D imperfections in the armor more pronounced.Rivets and Details: Paint the rivets white for contrast and visibility.Address any streaking or imperfections, correcting as needed.Yellow Dots: Water down Yriel Yellow and paint the center of holes with multiple layers.Consider using the paint directly from the pot for a harder yellow dot.Streaking Effect: Use Mournfang Brown to create streaks coming from the holes.Adjust paint thickness to control the streaking effect.Final Touches: Ensure streaking direction aligns with the model’s positioning. Face and foot This video shows how to lighten the face of Mortarion and also how to paint the weathering on his armour. The following paints were used: Games Workshop: Ceramite White, Flayed One Flesh, Pallid Wych Flesh, Ushabti Bone, Rhinox Hide. Step-by-step: How to Paint Face and foot Glazing for Face Lightening: Prepare a glaze using Games Workshop’s Flayed One Flesh paint and water (about 5 parts water to 1 part paint).Load the brush with the glaze and remove excess paint on kitchen roll.Apply thin layers of glaze to the face, focusing on central areas like the forehead, bridge of the nose, and cheeks.Be careful not to let the glaze pool in the recesses. Keep adjusting to maintain control over the layering.Pallid Wych Flesh Detailing: Use Games Workshop’s Pallid Wych Flesh, a thicker paint, to highlight the top of creases on the face.Build up contrast between creases and highlights gradually to create a natural look.Ensure that the creases are lightened, but maintain a balance with the overall lighting on the face.Final Highlight with Games Workshop’s Ceramite White: Apply Games Workshop’s Ceramite White to the highest points of the face, focusing on central areas.Use a controlled technique to avoid overdoing the highlights.Maintain subtlety and control over the white highlights for a natural effect.Chip-Weathering on Armor: Choose Games Workshop’s Rhinox Hide for chipping on the armor.Apply the paint with a brush, creating small marks on the model.Leave some patches of white paint between the chipped areas for added interest.Consider the positioning of chips, focusing on areas that would naturally experience wear and tear.Use a colour-coded brush to keep track of the tool’s usage and maintain control.Refining the Chipping: Adjust the thickness of the chipping lines to control the visual impact.Ensure that the chipping looks natural and not too high in contrast.Pay attention to the bottom of the foot, adjusting the highlighting based on the foot’s position.Add more chips on areas that would naturally experience more damage, like the front side of the leg. Cloth The following paints were used: Games Workshop: Ceramite White, Sotek Green, Abaddon Black, Evil Sunz Scarlet Vallejo: German Grey (Abaddon Black with a touch of white), Neutral Grey (Skavenblight Dinge), Pale Grey Blue (Celestra Grey). Step-by-step: How to Paint Cloth Primer Coat: Begin with a black primed base coat using Games Workshop: Abaddon Black or any black primer of your choice.Base Coat with German Gray: Apply Vallejo German Grey (a mix of Abaddon Black with a touch of white) using a stipple-like, rough fashion with a large, stiff brush. Rotate the brush to avoid obvious patterns.Dry Brush with Neutral Grey: Dry brush the cloth with Vallejo Neutral Grey (Skavenblight Dinge) using a large, stiff brush. Maintain a textured effect without removing the paint too severely.Fine Detailing with Sotek Green: Switch to a smaller brush (size 0 or similar) and use Sotek Green. Apply combinations of scratches and dots, focusing on smaller marks. Keep the paint fairly thick for strong marks.Gradual Highlighting: Mix Sotek Green with a small amount of Celestra Grey (Pale Grey Blue) in around a 2:1 ratio. Gradually build up layers, focusing on creases and details. Highlight raised areas more than recessed ones.Further Highlighting with Pale Blue-Gray: Mix Sotek Green with a small amount of Celestra Grey. Apply this highlight colour delicately, focusing on smaller areas. Enhance texture and pay attention to the shape of folds.Final Highlight with Pale Blue: Use Celestra Grey (Pale Blue) as the final highlight. Be extremely delicate with application, focusing on small details. Less is more at this stage, as the heavy paint can make strong marksGlazing with Abaddon Black: Use Abaddon Black for glazing. Apply it in the recesses to soften the texture marks and create a more blended look. Load the brush heavily for a more pronounced effect.Additional Glazing with Evil Sunz Scarlet: Use Evil Sunz Scarlet for additional glazing, mainly in the recesses. This adds contrast and depth to the demonic clothing. Experiment with colours to make the cloth more interesting.Final Touches and Details: Pay attention to focal points, such as areas where the cloth is attached to chains. Ensure that details are enhanced without losing the depth of the piece. More Mortarion Tutorials: Videos Not Showing? To view any of my paid tutorials, you need to be a member of the website – please click below to log in or join the site. Not sure about joining just yet? Check out my Youtube for all my free tutorials or sign up as a free “friend” member on this site and visit the free videos page! If you’d prefer to support me on Patreon, please visit: https://www.patreon.com/RichardGray [...]
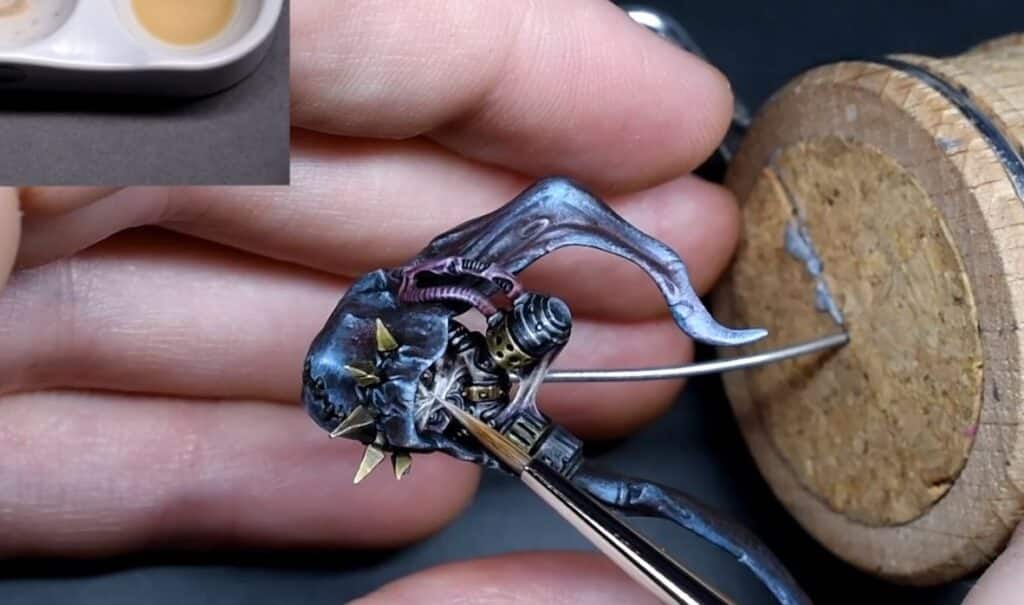
Learn how to paint Mortarion NMM Bronze the way I did on my Golden Demon winning model with this detailed guide. Using the techniques demonstrated on Mortarion’s scythe and backpack, you can achieve stunning, realistic bronze effects on your miniatures. What’s Covered in the Mortarion NMM Bronze Guide: Materials and Paints Needed: A comprehensive list of paints and tools required for the project, including specific brands and colours used. Model Preparation and Priming: Tips on preparing your model with a black primer to create a solid foundation for the NMM technique. Layering and Highlighting: Learn how to build up layers and create smooth transitions, focusing on the importance of primary and secondary highlights to achieve a realistic, shiny surface. Advanced Highlighting: Discover the use of additional colours to push highlights higher and achieve a warm, golden effect on the bronze. Final Touches and Glazing: Explore techniques for enhancing shadows and creating contrast to make the metal shine, using specific glazes for a polished look. Optional Verdigris Effect: Add a verdigris effect for colour contrast and extra depth, with tips on achieving a realistic, weathered appearance. Additional Features: High-Quality Images: The guide includes high-resolution images to illustrate each step, providing clear visual references to help you achieve the best results. Professional Tips: Benefit from my expert tips and tricks to enhance your painting skills and improve your techniques. Adaptable Methods: The techniques demonstrated in this tutorial are flexible and can be adapted to other models and projects, allowing you to apply your newfound skills across your miniature collection. Transform your miniatures with stunning non-metallic metal bronze effects using this detailed painting guide. Each step is carefully crafted to help you achieve high-quality results, making your models stand out in any collection. Download the full Mortarion NMM Bronze guide below and start painting today! You can also download the PDF here. Why Non-Metallic Metal Bronze? Mortarion NMM bronze not only aligns with his character and lore but also offers an artistically challenging and visually striking way to represent this complex and enduring figure from the Warhammer 40,000 universe. Mortarion, also known as the Prince of Decay, embodies the essence of corruption and pestilence. Painting him with NMM bronze creates a stark contrast between the enduring, solid nature of bronze and the theme of decay and entropy that Mortarion represents. This contrast can symbolize the internal conflict Mortarion faces – his enduring nature as a Primarch clashing with his allegiance to the forces of decay and despair. More Mortarion Tutorials If you don’t have an account, please sign up here! The website currently has over 350 video tutorials with steps and tips, plus a selection of PDFs. If you are not sure about joining, you can explore my free videos with a free membership, or take the plunge and become a full subscriber for full access. If you’d prefer to support me on Patreon, please visit: https://www.patreon.com/RichardGray [...]
Unlock the secrets to preparing Mortarion wings for stunning freehand painting with this comprehensive guide. This tutorial is designed to help you remove the existing vein details on the wings, providing a smooth canvas for your artistic creations. If you’re looking to create more surface area for freehand work, this guide will show you how. What’s Covered in the Mortarion Wings Guide: Materials and Tools Needed: A detailed list of all the tools required, including clippers, a scalpel, fine grain sandpaper, Tamiya Extra Thin Cement, and primer. Learn about the specific tools used and why they are ideal for this project. Step-by-Step Vein Removal: Techniques for using clippers and a scalpel to remove the vein details from the wings. Tips on ensuring a smooth finish and avoiding damage to the model. Sanding and Smoothing: Instructions for sanding the wings to achieve a clean, smooth surface ready for priming. Learn about different grades of sandpaper and how to use them effectively. Applying Tamiya Extra Thin Cement: Discover the magic of Tamiya Extra Thin Cement to soften and smooth any remaining details, enhancing the organic, fleshy appearance of the wings. Priming and Base Coating: Guidance on priming the wings with Vallejo Surface Primer and applying base colours using an airbrush or hand painting techniques. Creating a Flat Surface for Freehand Painting: Learn how to create a completely flat surface on Mortarion’s wings, allowing for detailed freehand painting. This technique can be applied to many other models to expand your freehand painting area. Final Preparations: Tips for preparing the wings with base colours and shading to set the stage for detailed freehand painting. Additional Features: High-Quality Images: The guide includes high-resolution images to illustrate each step, providing clear visual references to help you achieve the best results. Professional Tips: Benefit from my expert tips and tricks to enhance your modeling skills and improve your techniques. Adaptable Methods: The techniques demonstrated in this tutorial are flexible and can be adapted to other models and projects, allowing you to apply your newfound skills across your miniature collection. Transform Mortarion wings into a smooth, detailed canvas ready for freehand painting with this detailed modeling guide. Each step is carefully crafted to help you achieve high-quality results, making your model a standout piece. This guide will not only enhance your Mortarion model but can be adapted to create more surface area for freehand work on many other models as well. Please wait for the below Mortarion Wing Prep PDF to load. Alternatively, you can download it here. WingPrepforPatreon Explore more Mortarion Tutorials If you don’t have an account, please sign up here! The website currently has over 350 video tutorials with steps and tips, plus a selection of PDFs. If you are not sure about joining, you can explore my free videos with a free membership, or take the plunge and become a full subscriber for full access. If you’d prefer to support me on Patreon, please visit: https://www.patreon.com/RichardGray [...]
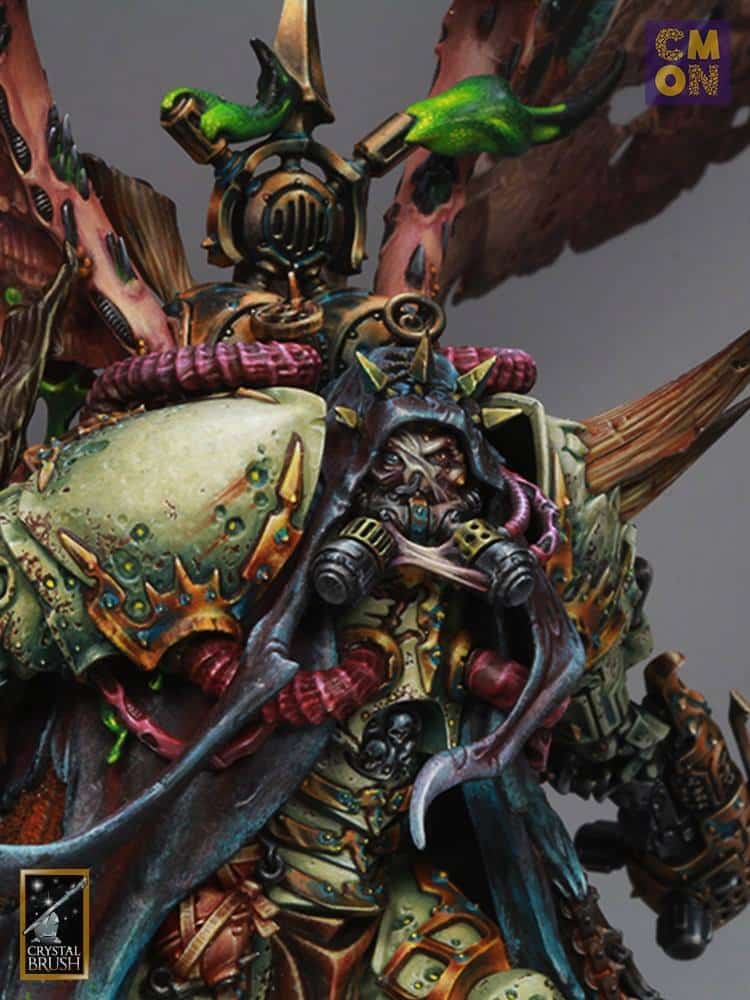
There are lots of textures and fine details on the feet and face of Mortarion – here’s how to paint Mortarions Face, Feet and Hood! Quick Jump to: Video: Face and footStep-by-step: How to Paint Mortarions Face and footVideo: Hood Part 1Step-by-step: How to Paint Mortarions Hood – Part OneVideo: Head and Hood Part 2Step-by-step: How to Paint Mortarions Head and Hood – Part TwoVideos Not Showing? Video: Face and foot This video shows how to lighten the face of Mortarion and also how to paint the weathering on his armour. The following paints were used:Games Workshop: Ceramite White, Flayed One Flesh, Pallid Wych Flesh, Ushabti Bone, Rhinox Hide. Step-by-step: How to Paint Mortarions Face and foot Glazing for Face Lightening: Prepare a glaze using Games Workshop’s Flayed One Flesh paint and water (about 5 parts water to 1 part paint).Load the brush with the glaze and remove excess paint on kitchen roll.Apply thin layers of glaze to the face, focusing on central areas like the forehead, bridge of the nose, and cheeks.Be careful not to let the glaze pool in the recesses. Keep adjusting to maintain control over the layering.Pallid Wych Flesh Detailing: Use Games Workshop’s Pallid Wych Flesh, a thicker paint, to highlight the top of creases on the face.Build up contrast between creases and highlights gradually to create a natural look.Ensure that the creases are lightened, but maintain a balance with the overall lighting on the face.Final Highlight with Games Workshop’s Ceramite White: Apply Games Workshop’s Ceramite White to the highest points of the face, focusing on central areas.Use a controlled technique to avoid overdoing the highlights.Maintain subtlety and control over the white highlights for a natural effect.Chip-Weathering on Armor: Choose Games Workshop’s Rhinox Hide for chipping on the armor.Apply the paint with a brush, creating small marks on the model.Leave some patches of white paint between the chipped areas for added interest.Consider the positioning of chips, focusing on areas that would naturally experience wear and tear.Use a colour-coded brush to keep track of the tool’s usage and maintain control.Refining the Chipping: Adjust the thickness of the chipping lines to control the visual impact.Ensure that the chipping looks natural and not too high in contrast.Pay attention to the bottom of the foot, adjusting the highlighting based on the foot’s position.Add more chips on areas that would naturally experience more damage, like the front side of the leg. Video: Hood Part 1 The following paints were used: Games Workshop: Abaddon Black, Temple Guard Blue, Xereus Purple, Balor Brown Vallejo: Black (Abaddon Black), Heavy Blue Grey (Celestra Grey), German Grey (Abaddon Black with a touch of white) P3: Morrow White (Ceramite White) Step-by-step: How to Paint Mortarions Hood – Part One Prepare the Model: Ensure that the Mortarion model’s hood has been properly primed in black. Fill in any gaps resulting from assembling the model using polystyrene cement. Sand down the gaps to create a smoother surface. Gather Paints and Tools:On your wet palette, prepare the following paints: Abaddon Black (Games Workshop)Temple Guard Blue (Games Workshop)Xereus Purple (Games Workshop)Balor Brown (Games Workshop)German Grey (Vallejo) – Mix Abaddon Black with a touch of whiteHeavy Blue Grey (Vallejo) – Celestra Grey (Games Workshop)Morrow White (P3) – Ceramite White (Games Workshop)Tools:Older paintbrush (to avoid quick wear)Size zero artist brush (for finer details)Palette for mixing paintsAbaddon black for glazingBase Coat with Blue: Take the older paintbrush and apply Temple Guard Blue onto the model’s hood. Alternate between German Grey and Temple Guard Blue for a quick blended look. Focus on the edges and tendrils, applying more blue to create a weathered effect. Refine with Finer Brush: Switch to the size zero artist brush and refine the texture. Pay attention to the spikes on top of Mortarion’s head, making them stand out against the dark color. Apply both German Grey and Temple Guard Blue in a more controlled manner. Add Black for Shading: Introduce deeper shading by mixing Abaddon Black with a small amount of water. Use the finer brush to apply this mixture to specific areas, enhancing the three-dimensional effect. Glaze with Red: Create a glaze using Abaddon Black and Xereus Purple (or any purple paint). Start near the highlights and work into the shadows, allowing the glaze to enhance the color variance. Repeat this process to build up the desired tone. How to paint Mortarions Face: Once the hood is painted, focus on the face. Be cautious around the details, such as the eyes and eyelids. Use Balor Brown for shadows and then apply Morrow White to pick out fine details. Pay attention to the eyes, painting them with a brighter yellow for contrast. Fine-Tune and Experiment: Continue fine-tuning the paintwork, experimenting with glazes and additional details. Remember to test the paint consistency on a spare surface before applying it to the model. Glaze and Highlight: Keep glazing over the areas, especially the highlights, to add depth. Use minimal amounts of paint to pick out final highlights, enhancing the overall texture and making it look three-dimensional. Video: Head and Hood Part 2 Vallejo: Neutral Grey : Skavenblight Dinge German Grey (Abaddon Black with a touch of white) English Uniform (XV-88) Japanese Uniform (Balor Brown) Ice Yellow (Ushabti Bone with a touch of yellow) Heavy Blue Grey (Celestra Grey) Black (Abaddon Black) Games Workshop: Emperor’s Children Rhinox Hide P3: P3: Morrow White (Ceramite White) Step-by-step: How to Paint Mortarions Head and Hood – Part Two How to paint Mortarions Face and Eyes: Start with a black paint (Vallejo: Black) to paint the pupils and cover the iris.Use Vallejo: Heavy Blue Grey (Celestra Grey) to paint the eyes themselves, avoiding pure white to create a more natural look.Consider painting cataracts initially but feel free to change to red and blue eyes for a magical effect.Highlighting the Eyes: Use Vallejo: White to highlight the lower edge of the eyes, creating a subtle, realistic contrast.Paint the iris around the black dots to add depth and detail to the eyes.Painting the Metal Halo: Apply a base coat of Vallejo: English Uniform (XV-88) on the metal halo, ensuring it’s less saturated than other gold areas on the model.Use Vallejo: Neutral Grey to blend into crevices and scratches, creating a reverse shading effect.Add Vallejo: Morrow White (Ceramite White) to blend in some warmth and detail.Rebreather Cylinders: Highlight the cylinders with a mix of Vallejo: Ice Yellow (Ushabti Bone with a touch of yellow) and Vallejo: Black.Blend in some of the previous colours to add more detail and scratches.Use Games Workshop: Emperor’s Children for the tubing, and highlight with Vallejo: English Uniform (XV-88).Cabling and Tubes: Highlight cabling with a mix of Vallejo: White and Vallejo: English Uniform (XV-88).Pay attention to angles and details, painting from one angle along the length to maintain consistency.Add final highlights sparingly using Vallejo: Ice Yellow (Ushabti Bone with a touch of yellow).Fleshy Details: Paint the stringy flesh between canisters with Vallejo: Rhinox Hide for an organic look.Use Vallejo: Evil Sunz Scarlet as a glaze to transition light hitting the piping while maintaining details.Final Touches: Paint black ribbing on the inside of the lower tube with Vallejo: Neutral Grey and highlight with Vallejo: Heavy Blue Grey (Celestra Grey).Ensure all details are well-defined and consistent. More Mortarion? Right this way: Videos Not Showing? To view any of my paid tutorials, you need to be a member of the website – please click below to log in or join the site. Not sure about joining just yet? Check out my Youtube for all my free tutorials or sign up as a free “friend” member on this site and visit the free videos page! If you’d prefer to support me on Patreon, please visit: https://www.patreon.com/RichardGray [...]
A set of video tutorials on How to Paint Mortarions Wings, with paints and step-by-step guides on freehand. Demon Wing Details First steps and basics For a pdf on how I cleaned the wing ready for painting, visit : https://richardgraycreations.com/mortarion-wing-prep-pdf/ ) All videos are recorded in HD 1080p or higher – use full screen for the full effect and let the video load completely. Demon Wing Details: Part One The following paints were used:Games Workshop: Rhinox Hide, Yriel Yellow, Kislev Flesh, Cadian Fleshtone, Moot Green, Xereus Purple, Evil Sunz Scarlet*note, in the video I show Emperor’s Children and Death Guard Green. These were not used in this video. Vallejo: Ivory Demon Wing Details: Part Two The following paints were used:Games Workshop: Mournfang Brown, Cadian Fleshtone, Kislev Flesh, Xereus Purple, Valejo: Ivory Demon Wing Details: Part Three The following paints were used:Games Workshop: Cadian Fleshtone, Kislev Flesh, Rhinox Hde, Xereus Purple, Vallejo Model Colour: Ivory Step by Step Tips: How to Paint Mortarions Wings – Demon Wing Details Part One: Prepare the Model: Confirm that the model has been properly primed, and any base colors, such as carmine, have been applied. Take a moment to inspect the model and identify any pre-painted outlines or details. Outline with Rhinox Hide: Utilise Rhinox Hide to start painting the outlines on the wings. This step involves creating the base pattern and initial details. Opt for Rhinox Hide over black to match the desired fleshy tone of the wings. Paint Veins with Xereus Purple: Select Xereus Purple to paint the vein-like details on the wings. Use a larger brush for broader coverage and to establish the initial structure. The combination of Xereus Purple and Rhinox Hide will give a dark, diseased appearance to the veins. Add Variation to Veins: Pay attention to the thickness and variation of the veins. Make deliberate wiggles and different shapes to create depth and interest. Ensure that the veins go over some of the previously painted thick lines for a more realistic effect. Consider Viscosity of Paint: Observe the viscosity of the paint; it should be thick enough to allow for fine lines. This is crucial for painting detailed and thin veins. You can load the brush more freely when using a thicker paint. Add Vein Details: Paint thin lines of purple coming out from certain areas, resembling veins spreading out. Use the thickness of the brush to your advantage, allowing for both longer lines and finer details. Introduce Spot Colours: Incorporate spot colours using Moot Green from Games Workshop. These spots will contrast with the purple, adding visual interest to specific areas, like craters on the wings. Highlight Veins: Highlight the veins by using Kislev Flesh, creating a raised vein effect. This will add depth and dimension to the wing. Soften Edges and Add Shadows: Use glue to soften edges and make the veins appear less pustule-like. Introduce shadow areas around the veins to enhance the three-dimensional look. Plan Lighting Directions: Consider the lighting directions on the model. Reflective lights and multiple light sources can contribute to a realistic 3D effect. Think about how the light interacts with the various elements on the wings. Part Two: Set Up Your Palette: Arrange your paints on the wet palette, as shown in the top right corner of the video. Let them mix a bit for added variation in your application. Begin with Cadian Fleshtone: Using Cadian Fleshtone, highlight the small segments between the veins. Focus on the upper areas to mimic light hitting from above. Use Reasonable Dilution: Ensure the paint is reasonably diluted, allowing for smoother application. As you’re highlighting, create the impression of shadows by avoiding direct application on dark vein edges. Utilise Mournfang Brown and Xereus Purple: Outline details with Mournfang Brown, and use Xereus Purple to add depth. These details may evolve organically as you progress. Fine-tune with a Sharp Brush: For fine details, use a sharp-tipped brush. Paint slightly thicker than usual, taking advantage of the wet palette to maintain consistency. Create Organic Look: Emphasise the fleshy and organic feel by avoiding a precise pattern. Moths and butterflies inspire the style, but the focus is on a fleshy appearance. Observe Light Source: Keep the light source in mind while highlighting. Work on veins to create shadows, ensuring a dynamic and realistic look. Add Transition Colours: Utilise mixed-up areas on the palette for transition colours. This adds depth and enhances the shadow effect, especially on larger, rounder areas. Experiment with Xereus Purple Outlining: Experiment with Xereus Purple outlining to enhance details. Remember, fine details may evolve as you progress, creating a unique and organic look. Balance the Details: Constantly tweak and balance details as you go. Ensure the veins, fleshy areas, and fine details complement each other for a cohesive appearance. Keep Consistency: Maintain consistency in the colour palette but vary the ratio of colours. This provides variation while adhering to a cohesive theme. Avoid Exaggeration: While enhancing details, avoid exaggeration. The goal is to create an organic, fleshy look without turning it into a three-dimensional eyeball. Part Three: Understand the Existing Freehand Progress: Examine the progress of the freehand on the model, especially the veins and patterns. Note that Rhinox Hide comes in two versions, with the thinner one used for glazes and quick transitions. Begin Painting the Veins: Start with Rhinox Hide to paint veins, emphasizing the connections and flow between them. Be mindful of curves and avoid making the veins look too straight or jarring. Create Veins as Eyelashes: Connect the veins to the eye, using them as eyelashes. This adds a unique and natural touch to the model, representing an organic connection between the eye and wing. Add Variation to Veins Around Holes: Paint veins around holes using Xereus Purple, varying the pattern to avoid repetition. Darken the area around the hole for contrast and tonal variation. Adjusting Freehand for a Cohesive Look: As the freehand progresses, ensure that the details flow well with each other, avoiding a disconnected appearance. Veins should follow the natural contours of the wing. Layering for Depth: Layer veins to create depth, using Kislev Flesh and Ivory for highlights. This technique makes the veins appear more 3D and layered. Darken and Outline: Darken certain areas using Rhinox Hide to create shadows and depth. Outline veins and details to make them stand out clearly. Highlighting and Refining: Use Vallejo Ivory to highlight specific sections, creating contrast and emphasizing the shapes. Continuously refine and tweak details, keeping an eye on the overall picture. Glazing for Smooth Transitions and Shapes: Use glazing to create smooth transitions between different paint layers. This is particularly useful for blending colours seamlessly. Apply glazes to emphasise the shapes of painted sections, ensuring a smooth and coherent look. Final Touches: Continue refining details, emphasising shapes, and making any final adjustments. Take your time to ensure a high-quality finish. How To Paint Mortarions Wings: Blue Eye The following paints were used:Games Workshop: Cybarite White, Flayed One Flesh, Doombull Brown, Balor Brown, Evil Sunz Scarlet, Lothern Blue, Ahriman Blue (optional) Rhinox Hide Vallejo: Ultramarine Blue, Night Blue (optional) Black, Pale Grey Blue P3: Ryn Flesh Step by Step Tips: How to Paint Mortarions Wings – Blue Eye Start with the Blue Detail on the Eyes: Commence the process by using Ultramarine Blue to paint a circle in the center of the existing black circle on the wing. Precision isn’t crucial at this point; you can refine it later. Refine the Blue Circle: Utilize black paint to clean up and refine the edges of the blue circle, serving as a guideline for the forthcoming details. Add Fine Details with Ultramarine Blue: Apply Ultramarine Blue to create fine lines and intricate details within the circle, representing the complex features of the eye. Allow the lines to follow the organic nature of the wing. Highlight the Blue Details: Use Flayed One Flesh to highlight selected blue details, creating a smooth transition between colours and enhancing the eye’s three-dimensional appearance. Introduce Pale Brown for Depth: Apply Pale Brown to add depth to the eye, concentrating on the lower section of the white. Be cautious not to use excessive paint to preserve the details from earlier steps. Create Highlights with Flayed One Flesh: Revisit Flayed One Flesh to introduce highlights on the blue details, enhancing the overall aesthetic of the eye. Glaze with Pale Grey Blue: Create a glaze using Pale Grey Blue and apply it to specific areas of the eye. This will help blend colours and add a layered effect to the strands and details. Add Red Veins and Details: Carefully reintroduce red veins, resembling eyelashes from the bottom of the eye. Utilize a dragging motion with the brush for precise lines. Correct Mistakes and Refine Detail: If any mistakes occur, use black paint to rectify errors and refine the intricate details, maintaining attention to the shape and flow of the lines. Final Touches on Reflections: Add reflections to the eye using semi-white to highlight the central part of the reflection. Consider the light source and aim for a realistic and captivating result. How To Paint Mortarions Wings: Demon Eye The following paints were used:Games Workshop: Mephiston Red, Wild Rider Red, Rhinox Hide Doombull Brown, Zamesi Desert, Yriel Yellow, Moot Green Temple Guard Blue, Sotek Green, Abaddon Black, Cadian Fleshtone, Kislev Flesh, Ceramite WhiteVallejo Model Colour: Ivory, BlackP3: Iosen Green (GW Warpstone Glow alternative) Ryn Flesh Step by Step Tips: How to Paint Mortarions Wings – Demon Eye Outline the Pupil: Begin by outlining the pupil of the eye. Focus on the inner shape rather than the outer, as you can fix any wonkiness later. Paint the Iris: Using a spread-out pattern, carefully paint the lines of the iris, starting from the center and moving outwards. Use a lighter colour to highlight some imperfections and indentations on the wing. Refine the Lines: Separate the lines, especially around the Nurgle symbol. Use Abaddon Black as a rubber to create a rough outline and add depth to the design. Introduce Different Colours: Experiment with different colours such as Temple Guard Blue and Wild Rider Red to add layers and details. Don’t be afraid to mix colours on the brush for a varied effect. Paint the Sclera: Apply Temple Guard Blue to the sclera, ensuring a smooth transition from the red, and be cautious not to paint over the detailed lines. Enhance Highlights: Use Ceramite White to brighten the eyes, creating a strong contrast. Paint carefully, following the shape of the eye for a rounded and natural look. Add Veins: Use Mephiston Red to paint veins onto the white of the eye, creating a realistic effect. Keep the lines subtle and centered for a natural appearance. Apply Glazes: Use glazes to soften transitions and tie the piece together. Deploy glazes by loading the brush from the wet palette. Final Highlights: Highlight with Ivory to emphasize details on the veins and enhance the overall look. Add Reflections: Apply White to the reflections on the eye to give it a lifelike and 3D effect. Create Wetness Effect: Using a small amount of Kislev Flesh or a similar colour, add small irregular dots to represent the wetness of the eye. Need more Mortarion? Check out the other tutorial videos, below: Free Video Tutorials Free videos (for logged in members – just sign up as a ‘friend’ to view and click any of the thumbs.To explore all of these, visit this page! If you don’t have an account, please sign up here! The website currently has over 350 video tutorials, plus step by step guides and PDFs. You can explore more free videos with a free “friend” membership, or take the plunge and become a full subscriber for full access. If you’d prefer to support me on Patreon, please visit: https://www.patreon.com/RichardGray [...]
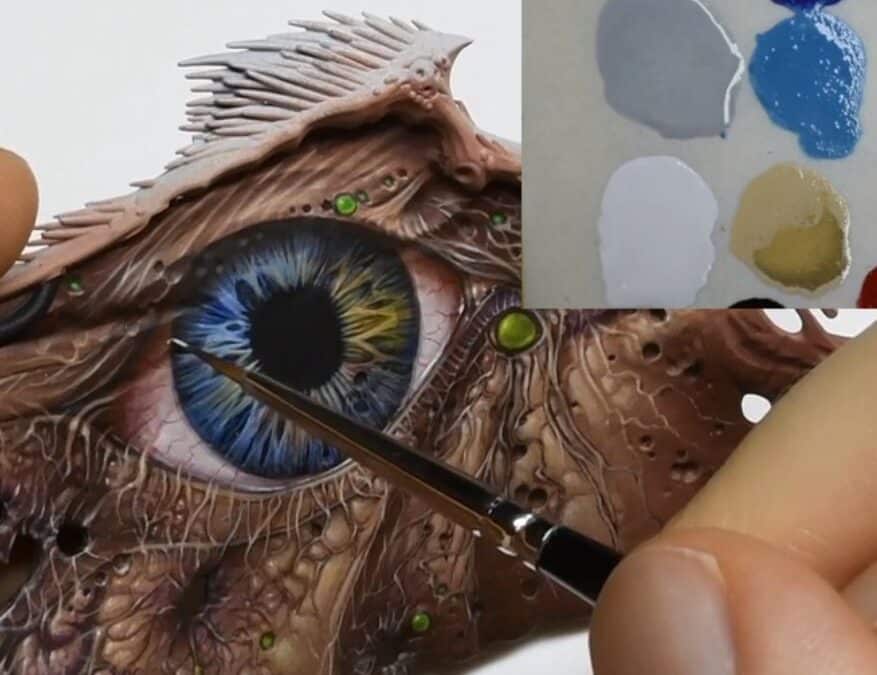
A video tutorial with paints and a step-by-step guide on How to Paint Mortarions Blue Eye on his wings. How to Paint Mortarions Blue Eye The following paints were used:Games Workshop: Cybarite White, Flayed One Flesh, Doombull Brown, Balor Brown, Evil Sunz Scarlet, Lothern Blue, Ahriman Blue (optional) Rhinox Hide Vallejo: Ultramarine Blue, Night Blue (optional) Black, Pale Grey Blue P3: Ryn Flesh Step by Step Tips: How to Paint Mortarions Blue Eye Start with the Blue Detail on the Eyes: Commence the process by using Ultramarine Blue to paint a circle in the center of the existing black circle on the wing. Precision isn’t crucial at this point; you can refine it later. Refine the Blue Circle: Use black paint to clean up and refine the edges of the blue circle, serving as a guideline for the forthcoming details. Add Fine Details with Ultramarine Blue: Apply Ultramarine Blue to create fine lines and intricate details within the circle, representing the complex features of the eye. Allow the lines to follow the organic nature of the wing. Highlight the Blue Details: Use Flayed One Flesh to highlight selected blue details, creating a smooth transition between colours and enhancing the eye’s three-dimensional appearance. Introduce Pale Brown for Depth: Apply Pale Brown to add depth to the eye, concentrating on the lower section of the white. Be cautious not to use excessive paint to preserve the details from earlier steps. Create Highlights with Flayed One Flesh: Revisit Flayed One Flesh to introduce highlights on the blue details, enhancing the overall aesthetic of the eye. Glaze with Pale Grey Blue: Create a glaze using Pale Grey Blue and apply it to specific areas of the eye. This will help blend colours and add a layered effect to the strands and details. Add Red Veins and Details: Carefully reintroduce red veins, resembling eyelashes from the bottom of the eye. Utilize a dragging motion with the brush for precise lines. Correct Mistakes and Refine Detail: If any mistakes occur, use black paint to rectify errors and refine the intricate details, maintaining attention to the shape and flow of the lines. Final Touches on Reflections: Add reflections to the eye using semi-white to highlight the central part. All videos are recorded in HD 1080p or higher – use full screen for the full effect and let the video load completely. Need more Mortarion? Check out the other tutorial videos, below: Free Video Tutorials Free videos (for logged in members – just sign up as a ‘friend’ to view and click any of the thumbs.To explore all of these, visit this page! If you don’t have an account, please sign up here! The website currently has over 350 video tutorials, plus step by step guides and PDFs. You can explore more free videos with a free “friend” membership, or take the plunge and become a full subscriber for full access. If you’d prefer to support me on Patreon, please visit: https://www.patreon.com/RichardGray [...]
I had to make the Nurgling companions of Mortarion have wings to match their master! Here is How to Paint Freehand Tiny Nurgle Wings, with two videos, paints and a step-by-step guide. How to Paint Freehand Tiny Nurgle Wings : Part One The following paints were used: Games Workshop: Ushabti Bone, Kislev Flesh, Cadian Fleshtone, Bugmans Glow, Rhinox Hide Vallejo: Model Colour Black (Abaddon Black) Step by Step: How to Paint Freehand Tiny Nurgle Wings Preparation Before you begin painting the cherub wings on your Mortarion model, ensure you have the necessary paints and tools. The paints used in this tutorial are Rhinox Hide, Bugmans Glow, Ushabti Bone, Kislev Flesh, Cadian Fleshtone, and Vallejo Model Colour Black (equivalent to Abaddon Black). Additionally, you’ll need a wet palette, a size double zero artist opus brush, and a scalpel. Wing Preparation Prepare the cherub wings by carefully removing any sculpted veins with a scalpel. Sand down the wings, apply glue to smooth the details, and then give them a black prime. Use an airbrush to apply a quick layer of Ushabti Bone to create a base. Base Layer Start with a 50/50 mix of Rhinox Hide and Bugmans Glow. Using the tip of your size double zero brush, apply this mixture to the wings, building up layers to achieve a translucent effect. This darker base will allow for easier highlighting later. Painting Details Using the tip of your brush, paint the lines and details on the wings with Rhinox Hide. Be mindful of the small scale, adapting the details as needed. Focus on creating flowing lines that follow the contours of the wings. Adding Depth Mix Kislev Flesh and Cadian Fleshtone on the wet palette. Apply this mixture to highlight the lines painted with Rhinox Hide. This glazing technique adds depth without excessive layering, providing a smooth transition. Eyes and Black Details Using Vallejo Model Colour Black, paint the eyes on the wings. Don’t worry about the size; you’ll refine them later. This step helps balance tones on the model. Use the tip of the brush to paint black details, such as spikes or dots, around the wings. Veins and Highlights Switch to Kislev Flesh and paint in the veins on the wings. Ensure they are clear and defined. Gradually build up highlights using Cadian Fleshtone and Ushabti Bone, focusing on edges and details. Soften transitions for a more natural look. Refining and Tweaking Continuously refine and tweak the details as you go along. Adjust the size and position of the eyes, ensuring they complement the overall composition. Use the wet palette for any necessary paint mixing. Final Touches Highlight imperfections in the wings, emphasizing dimensional details. Pay attention to areas underneath the eyes, adapting details to fit the small scale. Continue refining until you achieve the desired depth and clarity. All videos are recorded in HD 1080p or higher – use full screen for the full effect and let the video load completely. How to Paint Freehand Tiny Nurgle Wings: Part Two The following paints were used: Games Workshop: Kislev Flesh, Cadian Fleshtone, Rhinox Hide, Bugman’s Glow, Ushabti Bone, Ceramite White, Moot Green, Warpstone Glow, Sotek Green, Mephiston Red, Fire Dragon Bright, Waaagh! FleshVallejo: Black, Pale Blue Grey Step by Step: How to Paint Freehand Tiny Nurgle Wings Softening Previous Details Commence by gently blending and softening the details on the wings painted in the previous video. Utilize a glaze mixture of approximately five parts water to one part paint, specifically using Rhinox Hide, to seamlessly merge and soften the fleshing marks on the wings. Painting the Whites of the Eyes Proceed to paint the whites of the eyes with Kislev Flesh. Ensure to leave a small gap at the top of the eye to introduce a subtle shadow effect. Apply clean and flesh tones, directing your strokes towards you for a polished finish. Building Up Highlights on the Eyes Employ a slightly thicker paint to build up highlights on the whites of the eyes. Introduce a pale blue-gray colour later for a desaturated effect. Apply highlights by initiating strokes on the left-hand side, moving towards the centre, and then returning to the right-hand side, drawing towards the centre again for more pronounced highlights at the bottom. Adding Organic Details Apply Ryza Oxide to paint small dots around the eyes, creating an organic and three-dimensional appearance. Exercise caution to avoid disrupting existing lines, maintaining the realism of veins. Green Dots and Highlights Use Waaagh! Flesh and Moot Green to paint green dots around the tear duct area. Enhance the green dots by applying a line along the bottom right edge and a dot on the top left for a glossy bubble effect. Painting the Iris and Pupil For the blue eye, use Sotek Green and Mint Green to paint a ring around the lower section of the eye to represent the iris. The actual grey doesn’t matter; choose a light grey for painting reflections, ensuring a realistic and shiny appearance. Start with Vallejo Pale Blue Grey to paint a ring around the lower section of the eye to represent the iris. The actual grey doesn’t matter; choose a light grey for painting reflections, ensuring a realistic and shiny appearance. Highlight the iris with Ceramite White, adding a few strokes to enhance the glossy effect. Complete the red eye by applying Mephiston Red to the entire iris and pupil area. Use Fire Dragon Bright to add small lines separating the circles on the iris. Apply a highlight using Vallejo Pale Blue Grey, ensuring to maintain the same technique as with the blue eye. More Mortarion Tutorials: Videos Not Showing? To view any of my paid tutorials, you need to be a member of the website – please click below to log in or join the site. Not sure about joining just yet? Check out my Youtube for all my free tutorials or sign up as a free “friend” member on this site and visit the free videos page! If you’d prefer to support me on Patreon, please visit: https://www.patreon.com/RichardGray [...]
Another tutorial on how I got Mortarion painted, this time how I did the demon eye on his wings! Follow along with the video and guide, below. How To Paint Mortarions Demon Eye The following paints were used:Games Workshop: Mephiston Red, Wild Rider Red, Rhinox Hide Doombull Brown, Zamesi Desert, Yriel Yellow, Moot Green Temple Guard Blue, Sotek Green, Abaddon Black, Cadian Fleshtone, Kislev Flesh, Ceramite WhiteVallejo Model Colour: Ivory, BlackP3: Iosen Green (GW Warpstone Glow alternative) Ryn Flesh Step by Step Tips: How to Paint Mortarions Wings – Demon Eye Outline the Pupil: Begin by outlining the pupil of the eye. Focus on the inner shape rather than the outer, as you can fix any wonkiness later. Paint the Iris: Using a spread-out pattern, carefully paint the lines of the iris, starting from the center and moving outwards. Use a lighter colour to highlight some imperfections and indentations on the wing. Refine the Lines: Separate the lines, especially around the Nurgle symbol. Use Abaddon Black as a rubber to create a rough outline and add depth to the design. Introduce Different Colours: Experiment with different colours such as Temple Guard Blue and Wild Rider Red to add layers and details. Don’t be afraid to mix colours on the brush for a varied effect. Paint the Sclera: Apply Temple Guard Blue to the sclera, ensuring a smooth transition from the red, and be cautious not to paint over the detailed lines. Enhance Highlights: Use Ceramite White to brighten the eyes, creating a strong contrast. Paint carefully, following the shape of the eye for a rounded and natural look. Add Veins: Use Mephiston Red to paint veins onto the white of the eye, creating a realistic effect. Keep the lines subtle and centered for a natural appearance. Apply Glazes: Use glazes to soften transitions and tie the piece together. Deploy glazes by loading the brush from the wet palette. When I was getting Mortarion painted for the Golden Demon, I used a LOT of glazes. Be patient, take your time and glaze slowly. Final Highlights: Highlight with Ivory to emphasize details on the veins and enhance the overall look. Add Reflections: Apply White to the reflections on the eye to give it a lifelike and 3D effect. Create Wetness Effect: Using a small amount of Kislev Flesh or a similar colour, add small irregular dots to represent the wetness of the eye. Would you like to learn more about how I got Mortarion painted for the Golden Demon? Follow this link! Need more Mortarion? Check out the other tutorial videos, below: Free Video Tutorials Free videos (for logged in members – just sign up as a ‘friend’ to view and click any of the thumbs. If you don’t have an account, please sign up here! The website currently has over 350 video tutorials, plus step by step guides and PDFs. You can explore more free videos with a free “friend” membership, or take the plunge and become a full subscriber for full access. If you’d prefer to support me on Patreon, please visit: https://www.patreon.com/RichardGray [...]

Videos Not Showing?

To view any of my paid tutorials, you need to be a member of the website – please click below to log in or join the site.

warhammer painting tutorials

Not sure about joining just yet? Check out my Youtube for all my free tutorials or sign up as a free “friend” member on this site and visit the free videos page!

If you’d prefer to support me on Patreon, please visit: https://www.patreon.com/RichardGray

Leave a Reply