


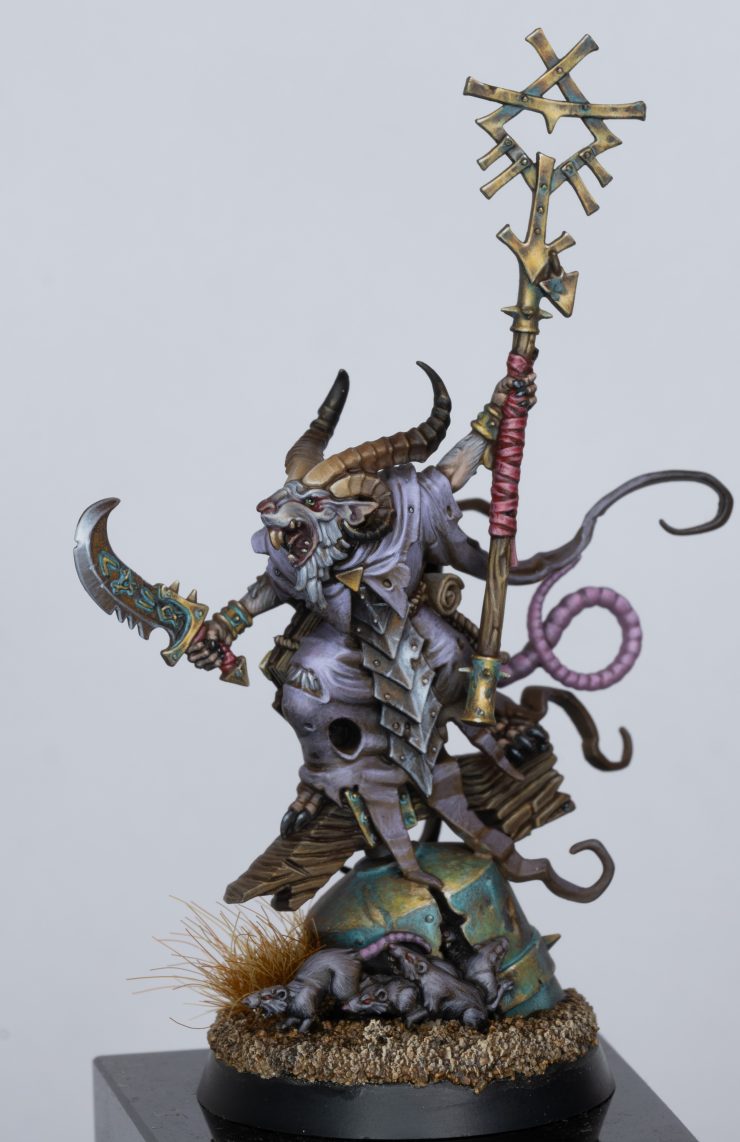
My series of video tutorials on How to Paint a Skaventide Grey Seer! I plan to paint many of the skaven from the box and provide videos for them, with the intention of having a painted army! It will be a challenge!
Don’t worry though, I will be carrying on with Golden Demon entry pieces at the same time. I’ve also just got another Nagash model, which should be exciting….
Video: How to Build a Skaventide Grey Seer
How to Build a Skaventide Grey Seer – Step by Step
Gather Your Tools: You’ll need Godhand clippers (or similar), a scalpel, Tamiya Extra Thin Cement, and sprue glue (Tamiya Extra Thin Cement mixed with plastic sprue bits).
Clean Your Model: Carefully clip out all the model pieces. Use your scalpel to scrape away any mould lines, always angling the blade away from the direction you’re moving to avoid cutting into the model. Take your time with this step.
Remove Push-Fit Connections: Even though the model is push-fit, I cut off the connection points to avoid gaps and make painting easier. This makes for a cleaner fit.
Assembly
Dry Fit: Before gluing, dry fit the pieces together to make sure everything lines up correctly.
Glue Main Body: Apply a small amount of Tamiya Extra Thin Cement to the connection points and join the pieces together. Use gentle pressure to ensure a tight fit.
Leave the Head: Don’t glue the head yet, as this will make painting easier.
Gap Filling
Identify Gaps: Look for any gaps or seams in the model where the pieces join.
Apply Sprue Glue: Carefully apply sprue glue to the gaps, being careful not to get any on areas you don’t want to fill. Use the tip of your scalpel to guide the glue and remove any excess.
Smooth Out: Once the sprue glue is dry, use a fine file or sandpaper to smooth out any rough edges.
Your Grey Seer model is now ready for priming and painting!
Additional Tips
- Work in a well-ventilated area as the glues and paints can be toxic.
- If you accidentally get sprue glue somewhere you don’t want it, you can try to quickly remove it with extra thin cement.
- Take your time and don’t rush the process. The more care you take in the preparation stages, the better the final result will be.
- If you’re painting a whole army, consider cutting some corners to save time, but still aim for a neat and tidy finish.
Video: How to Paint a Skaventide Grey Seer Part One
Paints and Materials
Paints:
- Games Workshop:
- Rhinox Hide
- Mournfang Brown
- XV-88
- Dechalla Lilac
- Balor Brown
- Morghast Bone
- Troll Slayer Orange
- Sotek Green
- Moot Green
- Khorne Red
- Sybarite Green
- Two Thin Coats:
- Dark Sun Yellow
- Vallejo:
- Model Colour Black
- Neutral Grey
- P3:
- Morrow White
Other Materials
- Airbrush:
- For applying the initial base coats of Rhinox Hide, Mournfang Brown, and XV-88. If you don’t have an airbrush, a rattle can can be used as a substitute.
- Wet Palette:
- To keep paints from drying out and for mixing colours.
- Brushes:
- I use a selection of Artist Opus brushes, such as a size 1 Artis Opus brush for the robes and a smaller brush for details like runes and rivets. Choose brushes that are appropriate for the level of detail you want to achieve.
How to Paint a Skaventide Grey Seer – Step by Step
Base Coating
- Prime: Start by priming the entire model black.
- Airbrush Base Coats: Use an airbrush to apply a coat of Rhinox Hide over the entire model. Then, focus a bit more on the head area with Mournfang Brown. Finally, spray XV-88 towards the head to create a focal point and raise the overall brightness. If you don’t have an airbrush, you can use a rattle can instead.
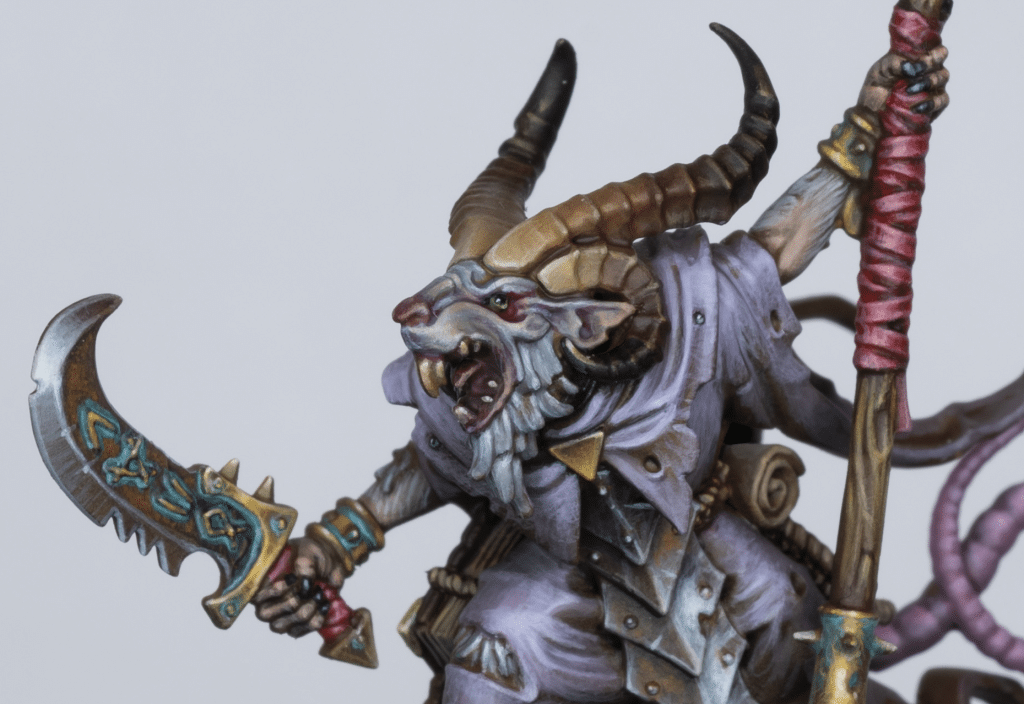
How to Paint a Skaventide Grey Seer Horns
- Paint Transition: Start with Morghast Bone on the tips of the horns, then blend in XV-88, Mournfang Brown, Rhinox Hide, and finally black. Overload your brush with thinned-down paint (1:1 ratio of water to paint) and blend as you go along.
- Multiple Coats: Apply multiple coats to achieve smooth transitions, especially near the base of the horns.
- Refine Details (Optional): Once dry, you can go back and pick out details on the horns with a smaller brush.
Skin and Fur
- Base Coat: Begin with Neutral Grey, then use a red to paint the nose, blend around the eyes, and fill in any gaps.
- Highlight: Mix Neutral Grey with increasing amounts of white and apply in layers, starting with a small amount of white and gradually adding more for brighter highlights.
- Refine Later: Don’t worry about making it perfect at this stage. You can refine the details later.
Eyes
- Black Base: Paint the entire eye area black, including the recesses.
- Moot Green Iris: Paint two-thirds of the eye with Moot Green, leaving the area under the eyebrow black.
- Black Pupil: If needed, use black paint to create a pupil in the centre of the eye.
- White Highlight: Add a small dot of white to the top of the iris for a shine. You can also add a small highlight with Morghast Bone in the bottom right of the eye.
Teeth
- XV-88 Base (If Needed): If the teeth aren’t already brown, apply XV-88 as a base coat.
- Morghast Bone Highlight: Paint the upper teeth with Morghast Bone, focusing on the top curve. Paint the very tips of the lower teeth.
- White Tips (Optional): For extra brightness, add a touch of white to the very tips of the teeth.
- Feel free to experiment with different brush sizes and paint consistencies to achieve the desired effect.
- Remember to work in a well-ventilated area, as the paints and solvents can be toxic.
- Don’t worry if the model doesn’t look perfect at this stage. You’ll have plenty of opportunities to refine it in the next steps.
Robes
- Mixes: Create three mixes on your wet palette:
- Challa Lilac
- Challa Lilac mixed with P3 Morrow White
- Challa Lilac mixed with Rhinox Hide
- Apply Base Coat: Apply the Challa Lilac and Rhinox Hide mix as the base coat for the robes.
- Highlight: Use the Challa Lilac mix to highlight raised areas, focusing on light placement and texture. You can add more white to the mix for brighter highlights.
- Layer: Build up layers of the highlight mix, gradually increasing the brightness.
- Optional Details: For a higher-level finish, spend more time adding texture and refining highlights.
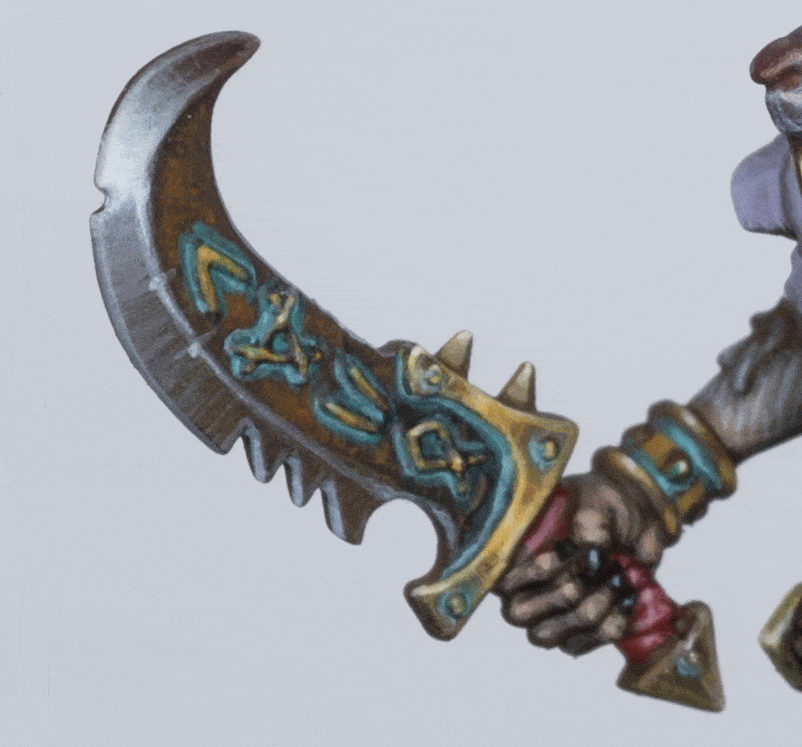
Sword
- Highlight Shine: Use a light grey (Neutral Grey mixed with white) to paint a shine spot on the blade.
- Base Coat the Blade: Cover the rest of the blade with Rhinox Hide, including the areas around the runes.
Metal Details
- Glaze Black: Glaze the recesses and darker areas of the metal parts with watered-down black paint to increase contrast.
- Scratches and Marks: Use a small brush to add scratches and marks with Neutral Grey, focusing on the darker areas.
- Rivets (Optional): Paint the rivets with metallic colours and add bounce highlights for extra detail.
Rust
- Stipple Rust: Stipple Mournfang Brown and Troll Slayer Orange onto the blade of the dagger, avoiding the runes.
- Rune Base Coat: Paint the runes with Balor Brown or a mix of Two Thin Coats Dark Sun Yellow and Two Thin Coats Scorched Earth.
Video: How to Paint a Skaventide Grey Seer Part Two – NMM and Verdigris
This is part 2 in a series for how to paint the new Grey Seer from the Skaventide box that Games Workshop sent me. This video focuses on the metal sections of the staff, particularly the top symbol, and how to paint it in NMM and add verdigris.
Paints Used
- Games Workshop: Rhinox Hide, Mournfang Brown, XV-88, Morghast Bone, Screaming Skull, Sotek Green, Sybarite Green
- Vallejo: Ice Yellow
- Two Thin Coats: Dark Sun Yellow
Inverted Highlighting and Verdigris
We’ll start by finishing the verdigris around the runes on the dagger. This involves inverted highlighting, where the darkest areas are actually the lightest. The mix for this is Sybarite Green and Sotek Green, with a touch of white added for the highlight layer. Remember this mix, as we’ll use it later on the staff and symbol.
Painting the Staff
- Base Colours:
- If you airbrushed the model with brown, you can use XV-88 as your starting point for highlights.
- For areas not covered by XV-88, use Mournfang Brown to blend the edges.
- Remember, the goal is a scratched, rough metal look, not a perfectly smooth finish.
- Highlighting:
- Start by mixing XV-88 with Dark Sun Yellow and apply it to the curves of the staff, focusing on areas where light would naturally hit.
- Gradually add more Dark Sun Yellow to your mix for subsequent highlights, building up the brightness.
- For the final highlights, use pure Dark Sun Yellow or Ice Yellow mixed with Dark Sun Yellow.
- Remember to paint the entire staff, including the back and sides, but focus the brightest highlights on the front.
- Adding Depth and Contrast:
- Use Rhinox Hide to darken areas and create contrast.
- Thin the Rhinox Hide and Mournfang Brown for smoother blending.
- Don’t worry about being too precise with the scratches; they’ll add to the overall texture.
Painting the Symbol
- Flat Surfaces:
- Painting NMM on flat surfaces can be tricky, but focus on edge highlights and texture.
- Use the same colors and techniques as for the staff, but pay attention to the light source and where the brightest highlights should be.
- Leave the sides of the symbol dark to enhance contrast.
- Verdigris:
- Mix Sotek Green and Sybarite Green (50/50) and heavily water it down (70% water, 30% paint).
- Apply the verdigris to the recesses and darker areas of the symbol.
- Remember, this is for visual effect, not realism, so focus on what looks best.
Additional Tips
- Use a size 1 Artist Opus brush for the scratchy marks.
- Don’t worry about perfect transitions; the scratches will help blend the colours.
- Consider the overall lighting of your model and adjust highlight placement accordingly.
- For a more desaturated gold, add more white to your Dark Sun Yellow mixes.
Video: How to Paint a Skaventide Grey Seer Part Three
Welcome to the final part of our Grey Seer tutorial from the Skaventide box set. In this guide, we’ll cover the remaining steps to complete the model, including painting the large bell with verdigris effects, the pink tail, the staff grip and wood, among other details!
Materials Needed
- Paints:
- Games Workshop: Sotek Green, Sybarite Green, Khorne Red, XV-88, Mournfang Brown, Rhinox Hide, Balor Brown, Morghast Bone, Cadian Fleshtone
- Vallejo: Old Rose, Ice Yellow, Model Colour Black, Neutral Grey
- P3: Morrow White
- Brushes: Size 1 Artis Opus brush, Size 00 Artis Opus brush
- Additional Supplies: Water for thinning paints, a wet palette, and a clean cloth for brush cleaning.
How to Paint a Skaventide Grey Seer Part Three – Step by Step!
Painting the Base
- Colours Used: Rhinox Hide
- Thin the Rhinox Hide paint heavily and use a larger brush to apply it under the robes and near the feet. This creates a transition and contrast against the light XV-88 applied earlier with an airbrush. The purpose here is to darken these areas, making the robes stand out more.
Painting the Bell
- Base Coat: XV-88 and Mournfang Brown mixed with Tooth and Coat Dark Sun Yellow.
- Highlighting: Mix various ratios of Mournfang Brown to Dark Sun Yellow, progressing from darker to lighter shades.
- Steps:
- Apply a base coat mix of XV-88 and Mournfang Brown.
- Highlight the bell using mixes of Dark Sun Yellow, gradually lightening the colours by adding more yellow.
- Focus on creating high-contrast areas with a loose application to simulate a metallic look.
- Ensure the top is bright and the sides remain darker.
- Apply verdigris effects using Sotek Green and Sybarite Green, focusing on shadowed areas.
Painting the Verdigris on the Bell
- Colours Used: Sotek Green, Sybarite Green, White for highlights.
- Application:
- Mix Sotek Green and Sybarite Green (roughly 50/50).
- Apply the verdigris in large, loose strokes, focusing on shadowed areas.
- Add a bit of white to the verdigris mix and stipple on lighter areas to create texture and variation.
Painting the Staff Grip and Wood
- Base Coat: Khorne Red for the grip.
- Highlights: Old Rose and Ice Yellow.
- Steps:
- Base coat the grip with Khorne Red.
- Mix Old Rose with Khorne Red for the first highlight, then Old Rose with Ice Yellow for further highlights.
- Highlight the wrap with Old Rose, working towards lighter mixes for the edges.
- For the wood, use XV-88 and highlight with Balor Brown and Morghast Bone.
Painting the Flesh
- Colours Used: Cadian Fleshtone, White.
- Application:
- Base coat with Cadian Fleshtone, then add white for highlights.
- Focus on picking out the knuckles, creases, and raised areas of the flesh.
Painting the Fur
- Colours Used: Neutral Grey, White.
- Application:
- Base coat with Neutral Grey.
- Highlight by mixing Neutral Grey with White.
- Use small, controlled strokes to simulate the texture of fur.
Painting the Tail
- Base Coat: Rhinox Hide and Old Rose.
- Highlights: Mix Old Rose with white.
- Steps:
- Base coat with Rhinox Hide and Old Rose, blending on the model for a smooth transition.
- Apply highlights by mixing Old Rose with white, focusing on the tail segments.
Finishing Touches on the Bell
- Stippling: Add more detailed verdigris using a stippling technique with Sotek Green and Sybarite Green mixed with white.
- Detailing: Focus on rivets and areas where verdigris would naturally accumulate.
Thank you for following along, and stay tuned for more tutorials on painting Skaven models and other exciting projects!
If you don’t have an account here on my website, please sign up here! I have over 350 video tutorials with steps and tips, plus a selection of PDFs. If you are not sure about joining, you can explore my free videos with a free membership, or take the plunge and become a full subscriber for full access.


If you’d prefer to support me on Patreon, please visit: https://www.patreon.com/RichardGray