


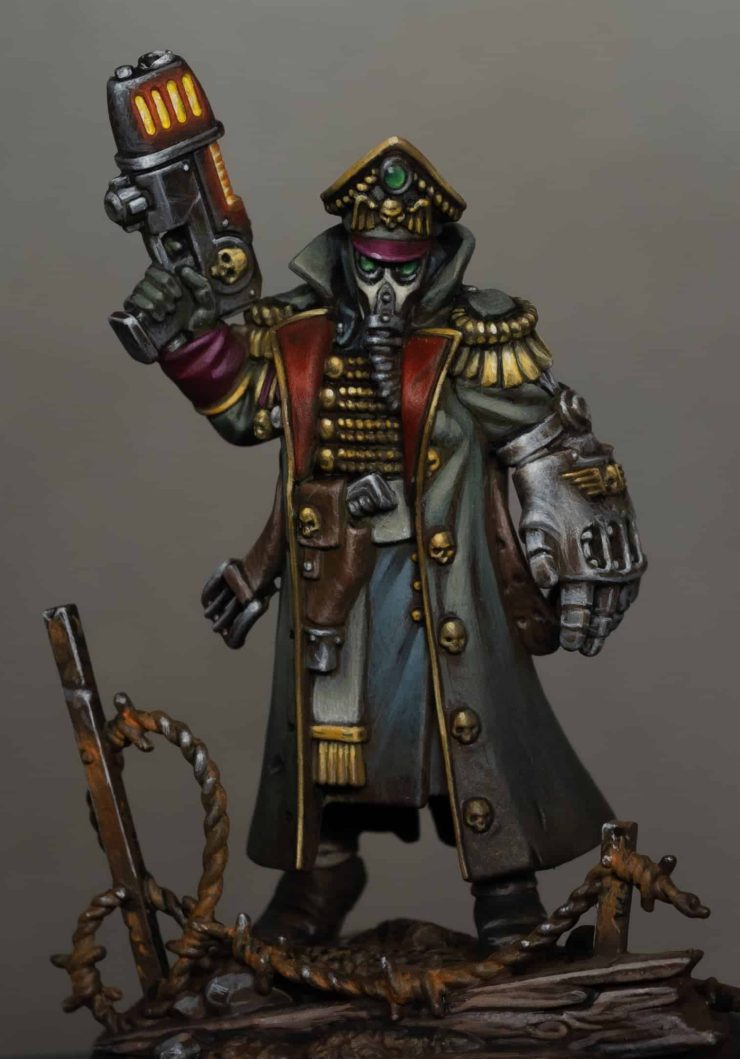
Right, let’s get into it. This is a two-part tutorial on how to paint at Krieg Commissar to a high standard. If you’ve watched my videos before, you’ll know I don’t tend to follow a strict step-by-step process—this is more about building up layers, adjusting as I go, and letting things develop naturally.
I’ll be using a size 4 brush for the entire model—not because I have to, just because I feel like making life difficult for myself. “If you push too hard with a big brush, you will deposit a massive amount of paint on the model. Ask me how I know.”
In Part 1, we lay down basecoats, first highlights, and introduce some gritty weathering to nail that battle-worn Krieg aesthetic. In Part 2, we refine the details—building up the greatcoat, pushing contrast in the red and gold sections, tackling non-metallic metals (NMM) on the Power Fist, and adding a plasma glow effect (OSL) without an airbrush.
“I’ll paint a little area, almost finish it, move on to another, and then go back and tweak things.” That’s just how I work—so if that sounds familiar, you’re in good company.
Video : How to Paint a Krieg Commissar Part One
How to Paint a Krieg Commissar – Paints Used
Games Workshop:
- Mephiston Red
- Evil Sunz Scarlet
- Wild Rider Red
- Mournfang Brown
- Morghast Bone
- XV-88
Vallejo:
- Neutral Grey
Two Thin Coats:
- Dark Sun Yellow
P3:
- Morrow White
AK Interactive:
- Grey Green
- Very Dark Brown
- Camouflage Green
- Sky Grey
- Wine Red
- Black
- Anthracite Grey
- Sand Yellow
- Volcanic Yellow
- Deep Orange
How to Paint a Krieg Commissar – Step-by-Step Tutorial Part One
Step 1: Preparing the Model
- Assembly & Cleaning: The Commissar is fully assembled and primed. Any minor mould lines should be scraped off where possible.
- Priming: A dark primer is used as a base to help with contrast and depth.
Step 2: Base Coating the Model
- Overall Base Colour:
- Cover the entire model with AK Very Dark Brown. This serves as a foundation for later layers.
- Apply using a size 4 brush for speed. Alternatively, use a sponge or airbrush for even coverage.
- Adding Camouflage Green:
- Apply AK Camouflage Green loosely over the brown base. This should be blended in while the base is still slightly wet.
- Focus on a grimy, weathered effect, rather than full coverage.
Step 3: Painting the Clothing
- Main Coat (Greatcoat)
- Base coat using AK Anthracite Grey.
- Apply loose, textured highlights using AK Sky Grey + P3 Morrow White.
- Scratchy brush strokes add a worn fabric appearance.
- Inside Lining & Trim
- Base coat with Mephiston Red.
- Highlight using Evil Sunz Scarlet, then further highlight with Wild Rider Red.
- Use Wild Rider Red sparingly to avoid the coat looking too pink.
- Gold Trim (Non-Metallic Gold – NMM)
- Base coat with XV-88.
- Build highlights with Two Thin Coats Dark Sun Yellow, then AK Sand Yellow.
- Add selective P3 Morrow White highlights on raised areas.
- Use bounce highlights for a reflective effect on buttons.
Step 4: Painting the Rope & Accessories
- Rope Details:
- Base coat all rope elements with XV-88.
- Add highlights using AK Sand Yellow.
- Use P3 Morrow White sparingly for final bright accents.
- Waist Sash (Scarf-like cloth)
- Base coat with AK Grey Green.
- Highlight using AK Sky Grey, blended softly.
Step 5: Painting the Faceplate & Tubing
- Faceplate (Skull-like mask)
- Base coat with AK Grey Green.
- Highlight using Morghast Bone.
- Further highlights with P3 Morrow White to make it stand out.
- Tubing (Non-Metallic Metal – NMM Steel Effect)
- Base coat with Vallejo Neutral Grey.
- First highlight with AK Sky Grey.
- Final highlight using P3 Morrow White for the brightest reflections.
Step 6: Painting Leather Elements
- Gun Holster & Belt
- Base coat using Mournfang Brown.
- Highlight by mixing Mournfang Brown + P3 Morrow White, progressively lightening.
- Use Rhinox Hide as a glaze to deepen shadows if needed.
- Use scratchy texture to simulate worn leather.
Step 7: Painting the Gun Handle (Non-Metallic Metal – NMM)
- Handle NMM Effect
- Base coat with Vallejo Neutral Grey.
- First highlight with AK Sky Grey.
- Apply P3 Morrow White only for extreme shine spots.
- Ensure black remains in the deepest areas for contrast.
Key takeaways:
- Use a size 4 brush where possible, but switch to a smaller brush for finer details.
- Layer translucently over the base coat to build depth naturally.
- Texture and variation make materials more believable.
- Use different tones for reds and browns to create richness in the colour scheme.
Video : How to Paint a Krieg Commissar Part Two
Welcome to the final part of my two-part tutorial on painting a Death Korps of Krieg Commissar. If you’ve followed along from Part 1, you’ll have already seen how we tackled the basecoats, highlights, and early weathering effects. Now, we’ll be bringing it all together with final highlights, glazing, non-metallic metals (NMM), and some subtle object source lighting (OSL) on the plasma pistol.
How to Paint a Krieg Commissar – Step-by-Step Tutorial Part Two
1. Refining the Greatcoat Highlights
We’ll start by refining the highlights on the greatcoat, making sure the folds and creases stand out properly while keeping the overall look grim and worn.
Paints Used:
- Basecoat: AK Very Dark Brown (from Part 1)
- Mid-tone: AK Dark Green Grey
- Highlight: AK Grey Green (or Dark Green Grey + a little white if you don’t have it)
- Final Glaze: AK Black
Method:
- Map out highlights using Dark Green Grey, focusing on the raised folds and areas where light naturally catches. If unsure, hold the model under a lamp to see how the light falls.
- Use small, controlled strokes—the further you move from the brightest point, the more you space out the marks, allowing the base colour to show through for natural shading.
- Refine the highlights with Grey Green, but be selective. Too much will make the coat too light—this should only be used on the sharpest creases.
- Glaze black into the shadows, thinning it with five parts water to one part paint. This deepens the folds and adds to the grimy look. Work in thin layers, waiting for each to dry before applying another.
- If you want an extra gritty, worn effect, you can glaze Rhinox Hide into some areas for warmth and variation.
“One trick here—don’t just follow the light. If a crease or fold looks a bit boring, add a higher contrast highlight next to a dark area. This makes certain sections pop and adds more visual interest.”
2. Highlighting the Red Sections (Lapels & Trim)
The red areas were first blocked in during Part 1. Now, we’ll refine them with smooth highlights to create depth and richness.
Paints Used:
- Basecoat: AK Wine Red
- Highlights:
- First highlight: Wine Red + a little white
- Further highlights: More white added to Wine Red
Method:
- Start with Wine Red, reinforcing any basecoat areas that need a little smoothing.
- Add small amounts of white to the Wine Red for progressive highlights, layering them onto the sharp edges and folds.
- Keep the brightest highlights concentrated on upward-facing areas—don’t overdo it, or the red will start looking pink rather than deep and rich.
“Unlike the red on the coat, this time I’m using more white in the highlights, giving the fabric a slightly different look.”
3. Painting the Gold Details (Non-Metallic Gold)
Now, onto the non-metallic metal (NMM) gold for the shoulder decorations, trim, and buttons.
Paints Used:
- Basecoat: Games Workshop XV-88
- Mid-tone: Two Thin Coats Dark Sun Yellow
- Highlight: AK Sand Yellow
- Final Spot Highlight (optional): P3 Morrow White
Method:
- Start by blocking in the gold areas with XV-88.
- Gradually build up the highlights with Dark Sun Yellow, painting in the direction of the light.
- Use Sand Yellow sparingly, focusing only on the brightest edges and highest points.
- Add tiny white highlights to the skull buttons and cap insignia, but avoid overusing white on the fabric areas—it helps separate the metallic and fabric elements.
- On shoulder braids, paint a bounce highlight using Dark Sun Yellow underneath the twists. This small trick makes the ropes feel more three-dimensional.
“For real-world inspiration, look at military gold braiding—it’s bright, but not as reflective as polished metal, so the transitions should be a bit softer than usual NMM.”
4. Painting the Eye Lenses & Helmet Gem
Since the cap got in the way of filming the eye lenses, I painted the helmet gem in the same style—so if you can follow that, you can apply it to the eyes too.
Paints Used:
- Basecoat: AK Dark Green
- First Highlight: AK Deep Green
- Further Highlights: AK Deep Green + Sand Yellow (or White)
- Final Shine Dot: P3 Morrow White
Method:
- Block in the lenses or gem with Dark Green, then apply a first highlight of Deep Green, focusing on the lower right.
- Continue adding highlights, mixing in Sand Yellow or White for each stage, keeping the brightest area small and focused.
- Finally, add a tiny white shine dot in the upper left corner.
“If the highlight transitions feel too stark, go back with the earlier highlight stage and lightly glaze over the edges—it’ll soften the blend.”
5. Painting the Power Fist (NMM Steel)
The Power Fist is painted in a non-metallic metal (NMM) steel style, with a grimy, heavily worn finish.
Paints Used:
- Basecoat: AK Neutral Grey
- Mid-tone: AK Sky Grey
- Final Highlights: P3 Morrow White
- Glaze: Games Workshop Mournfang Brown (for weathering)
Method:
- Block in the Power Fist and metal sections with Neutral Grey.
- Use Sky Grey for strong edge highlights and shine spots on the fingers, knuckles, and plating.
- Apply Mournfang Brown as a glaze to dirty up the metal—thin it down (4:1 water-to-paint ratio) and gently shade areas that should look weathered.
- Use pure white only on the brightest reflection points.
“The trick to good NMM is getting the contrast right. Keep most of the Power Fist fairly dark and push the light only in key spots for maximum impact.”
6. Object Source Lighting (OSL) on the Plasma Pistol
For simple but effective glow effects on the plasma pistol, we’re going old-school—no airbrush, no fluorescent paints.
Paints Used:
- Base White Layer: P3 Morrow White (multiple thin coats)
- Glow Base Colour: AK Volcanic Yellow
- Deep Glow: AK Deep Orange
- Final Glow: Games Workshop Evil Sunz Scarlet
Method:
- Basecoat the glow areas in Morrow White—this gives a bright undercoat.
- Apply Volcanic Yellow, letting it flow into recesses.
- Add Deep Orange to the edges of the glow, creating heat variation.
- Use Evil Sunz Scarlet as a final blend to deepen the glow.
- Apply a black glaze (5:1 water to paint) around the glow area to smooth transitions.
“Fluorescent paints would make this pop more, but they fade over time—so this is a more durable approach.”
Final Touches: Base & Barbed Wire
The rusted barbed wire was painted with:
- Games Workshop Mournfang Brown (base rust)
- AK Deep Orange (weathering)
- AK Neutral Grey & Sky Grey (metal scratches)
And That’s a Wrap!
That’s the Krieg Commissar complete! Next, I’ll be applying the same techniques across the rest of the army, so stay tuned for future tutorials.
If you found this useful, let me know in the comments below —I’d love to hear how your models turned out.
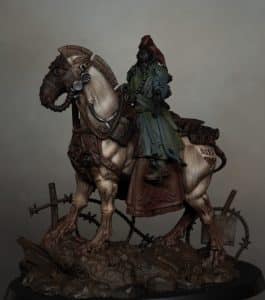
More Krieg Tutorials? Oh, go on, then.


Videos Not Showing?
To view any of my paid tutorials, you need to be a member of the website – please click below to log in or join the site.


Not sure about joining just yet? Check out my Youtube for all my free tutorials or sign up as a free “friend” member on this site and visit the free videos page!
If you’d prefer to support me on Patreon, please visit: https://www.patreon.com/RichardGray