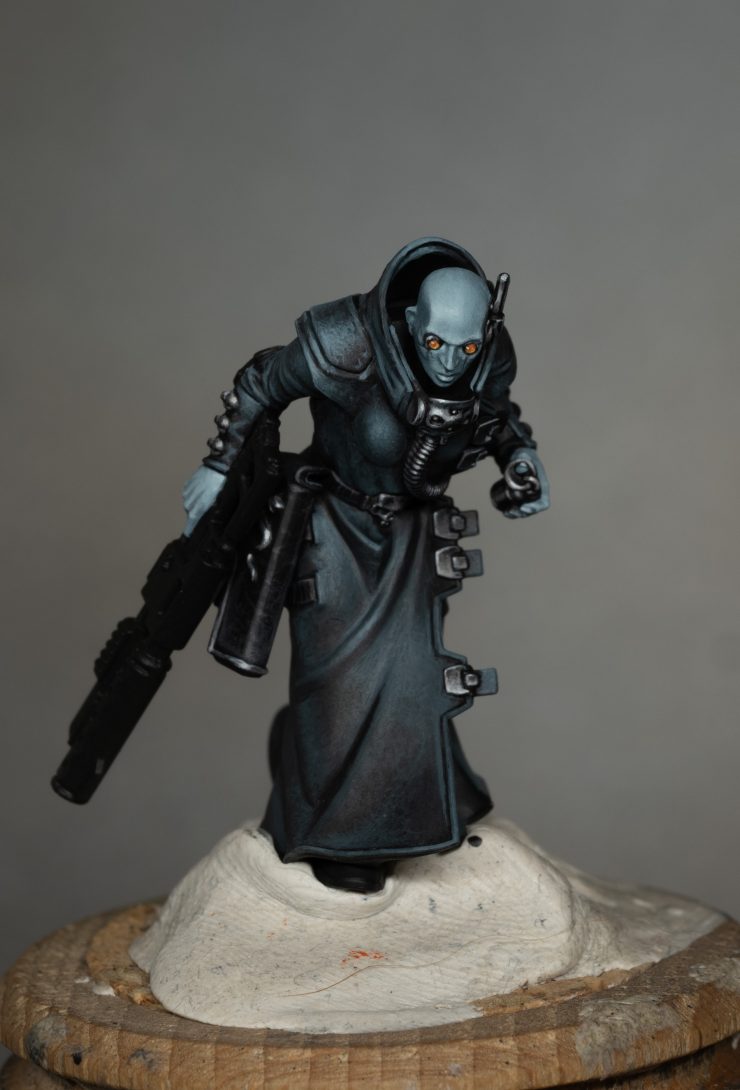
In this how to paint a Delaque Ganger from Necromunda tutorial, we’ll focus on painting skin, coat, and eye lenses, perfecting the model’s core details with a mix of smooth and textured techniques. Let’s dive straight in.
Video: How to Paint a Delaque Ganger from Necromunda
Materials and Tools
- Brushes:
- Size 0 and 1 for basecoats and general painting. (I use the Artis Opus range of brushes).
- Size 00 for details like eye lenses and highlights.
- Palette:
- Wet palette for smoother paint consistency.
- Primer:
- Black primer (spray or brush-on).
- Lighting:
- Daylight lamp or equivalent for accurate colour representation.
- Magnifying Lamp (optional):
- Useful for fine details like eyes and facial features.
- Paint Thinner/Medium:
- Water or acrylic thinner for glazing and smooth transitions.
Paints
Pastel Blue (AK)
Anthracite Grey (AK)
White (AK)
Black (AK)
Deep Orange (AK)
Volcanic Yellow (AK)
Troll Slayer Orange – as an alternative to Deep Orange (Citadel)
Step by Step – How to Paint a Delaque Ganger from Necromunda
Step 1: Skin
Paints Used:
- Basecoat: Pastel Blue
- Shadows: Anthracite Grey
- Highlights: White
Steps:
- Basecoat:
Thin Pastel Blue with a 2:1 ratio of paint to water and apply an even coat across the skin. Use a size 0 brush for larger areas and a size 00 for small details like fingers. - Shadows:
Mix Anthracite Grey with a touch of Pastel Blue (1:3 ratio) for the first shadow layer. Apply it to recessed areas, such as under the jawline, eye sockets, and between fingers.
For deeper shadows, use pure Anthracite Grey sparingly in the deepest recesses. - Highlights:
Gradually build highlights by mixing Pastel Blue with increasing amounts of White (1:1, then 1:2 ratios). Focus on raised areas like the nose bridge, cheekbones, and knuckles.
For the final highlight, use pure White on the most prominent points.
Pro Tip: Keep transitions smooth by using a glazing technique—thin the paint heavily and layer it gradually.
Step 2: Coat
Paints Used:
- Basecoat: Anthracite Grey
- Shadows: Black
- Highlights: Mix of Anthracite Grey and White
Steps:
- Basecoat:
Apply a smooth layer of Anthracite Grey. Ensure an even finish by working with thin layers and letting each dry before adding another. - Shadows:
Deepen shadows with a mix of Anthracite Grey and Black (1:1 ratio). Concentrate on areas like the folds and seams of the coat. Use a glaze to avoid harsh lines. - Highlights:
Lighten Anthracite Grey with small amounts of White to create progressive highlights. Apply these to the edges of the coat, such as the lapels, sleeve cuffs, and raised folds.
Use a fine detail brush for edge highlights, keeping the strokes sharp and deliberate.
Pro Tip: For ultra-fine edge highlights, slightly dampen your brush to control the flow of paint.
Step 3: Eye Lenses – Vibrant Focal Points
Paints Used:
- Basecoat: Deep Orange
- Highlights: Mix of Deep Orange and Volcanic Yellow
Steps:
- Basecoat:
Apply Deep Orange to the lenses, ensuring complete coverage. Use a size 00 brush to stay within the contours. - Highlights:
Mix Deep Orange with a touch of Volcanic Yellow (2:1 ratio) for the first highlight. Add this to the bottom half of each lens to mimic light reflection.
For the brightest highlight, use pure White as a small dot near the lower edge..
What’s Next?
With the skin, coat, and lenses complete, you’ve laid a solid foundation for your Delaque Ganger. In the next part, we’ll take on non-metallic metals, armour panels, and final details to bring the model to life.
Videos Not Showing?
To view any of my paid tutorials, you need to be a member of the website – please click below to log in or join the site.
Not sure about joining just yet? Check out my Youtube for all my free tutorials or sign up as a free “friend” member on this site and visit the free videos page!
If you’d prefer to support me on Patreon, please visit: https://www.patreon.com/RichardGray


