


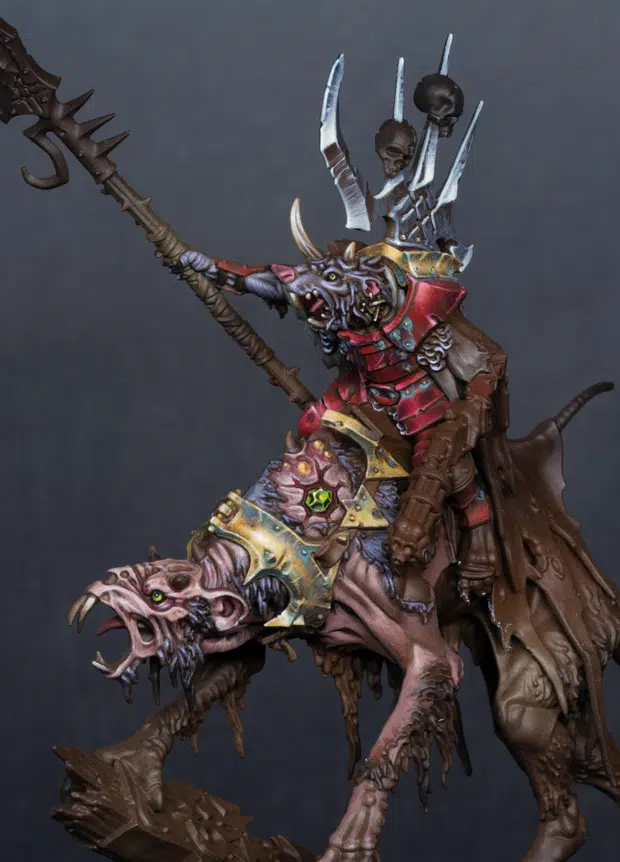
Welcome to my latest video, ‘How to paint a Clawlord on Gnawbeast” in which we continue our journey with the Skaven characters from the Skaventide box set, focusing on the Claw Lord on Gnaw-Beast. This guide will detail the steps, techniques, and specific paints used to achieve a high-standard tabletop miniature. All paints and materials are listed below the video, plus simple step-by-step instructions.
Video Part One – How to Paint a Clawlord on Gnawbeast – Clawlord
Paints and materials needed
- Paints:
- Games Workshop: Evil Sunz Scarlet, Barak Nar Burgundy, Rhinox Hide, XV-88, Balor Brown, Moot Green, Yriel Yellow, Morghast Bone
- Vallejo: Ice Yellow
- P3: Morrow White
- Brushes: Size 00 Artis Opus brush
- Primer: Black primer
- Airbrush (optional for base coating)
Step-by-Step Guide on How to Paint a Clawlord on Gnawbeast
Preparation and Priming
Prime the Model: Start by priming your Claw Lord on Gnaw-Beast with a black primer. Ensure even coverage across the entire model.
Base Coats
Base Coat with Airbrush:
- Apply a coat of Rhinox Hide over the entire model.
- Follow with Balor Brown in selected areas.
- Finally, spray XV-88 on the focal points such as the head, knees, thighs, shoulders, and the hand holding the spear. This step helps lighten these areas for easier detail painting later.
Painting the Armour
Red Armour:
- Start with Evil Sunz Scarlet for the base coat on the red armor sections.
- Highlight progressively by mixing Ice Yellow with Evil Sunz Scarlet, increasing the amount of Ice Yellow with each layer to create a warm pink highlight.
- If you prefer a cooler pink, substitute Ice Yellow with white.
- For a more vibrant red, over-highlight with the lighter mix and then glaze back with the darker red to deepen the colour.
Rivets and Details:
- Initially, paint the rivets red like the armour.
- Optionally, you can return later to add verdigris or additional contrast paint to make them stand out more.
Texture and Highlights
Scratchy Method for Highlights:
- Using a size 00 Artis Opus brush, mix your paint to a 50/50 ratio of water to paint. This consistency allows for precise lines without being too translucent.
- Apply the paint using the very tip of the brush in a scratchy motion to create texture. Ensure the consistency is right to avoid overly soft or translucent lines.
Eyes
Painting the Eyes:
- Base the eyes with black paint.
- Paint a large section of the eye with Moot Green, leaving a small black outline.
- Add a white dot near the top of the pupil and a small highlight of Yriel Yellow in the bottom right to give the eyes depth and vibrancy.
Horns and Teeth
- Horns:
- Base coat the horns with Balor Brown.
- Highlight with Morghast Bone followed by Ice Yellow.
- For final highlights, add dots of white to the most prominent raised areas.
- Teeth:
- Similar to the horns, base with Balor Brown.
- Highlight the top of each tooth with Morghast Bone and finish with white.
Fur
Painting the Fur:
- Base the fur with a mix of Rhinox Hide and white, creating a grey tone.
- Add more white to the mix for successive highlights, aiming for an off-white final highlight.
- Paint the fur texture using a similar technique to the scratchy method, applying fur lines with a 50/50 paint mixture, pulling the brush towards yourself for better control.
Adjustments
Additional Highlights and Adjustments:
- Reassess the model and add any final touches to ensure all details are highlighted appropriately.
- Consider glazing over areas where highlights might have dulled the base colour too much.
- Optionally, use a contrast paint to enhance the red armour further and give it a satin finish for added vibrancy.
Video Part Two – How to Paint a Clawlord on Gnawbeast – Gnawbeast
Materials and paints needed
Paints
- Games Workshop:
- Rhinox Hide
- XV-88
- Balor Brown
- Moot Green
- Yriel Yellow
- Bugmans Glow
- Cadian Fleshtone
- Sotek Green
- Sybarite Green
- Khorne Red
- Two Thin Coats:
- Dark Sun Yellow
- Vallejo:
- Ice Yellow
- Model Colour Black
- P3:
- Morrow White
Brushes
- Size 1 Artist Opus brush
- Size 00 Artist Opus brush
(I use Artist Opus, but any high-quality brush will do!)
Painting the Metal Trim
Base Colour: Apply Dark Sun Yellow (Two Thin Coats) to the metal trim. You can use Balor Brown as an alternative.
Highlighting:
- Mix Dark Sun Yellow with Morrow White for the highlights. Gradually add more white for brighter highlights.
- Use a size 00 brush to paint fine scratches and texture on the metal.
Adding Verdigris:
- Mix Sybarite Green with Sotek Green (50/50).
- Apply this mixture to the recesses and darker areas of the metal trim.
- Add white to the mix for brighter highlights and apply sparingly to avoid overdoing it.
Painting the Skin
Base Colour:
- Apply Bugmans Glow as the base colour.
- Highlight using Cadian Fleshtone. Mix with white for brighter highlights.
Highlighting:
- Focus on smoother transitions compared to the metal.
- Add small amounts of white to Bugmans Glow or Cadian Fleshtone for progressive highlights.
Shading: Use Rhinox Hide to deepen shadows and enhance contrast where necessary.
Painting the Fur
Base Colour:
- Use Rhinox Hide as the base colour for the fur near the skin.
- Progressively darken towards the tips using black.
Highlighting:
- Apply Mournfang Brown for mid-tones.
- Highlight with a mix of Rhinox Hide and Morrow White to create lighter fur towards the top.
Painting the Warpstone
Base Colour: Start with Moot Green.
Highlighting:
- Highlight using Yriel Yellow.
- For the brightest highlights, mix Yriel Yellow with Morrow White and apply to the sharp edges and facets.
Painting the Teeth
Base Colour: Use a combination of Cadian Fleshtone and Morrow White for the base of the teeth.
Highlighting: Apply white highlights to the tips and edges for a shiny enamel look.
Painting the Eyes
Base Colour: Start with a base of black.
Iris and Pupil:
- Paint the iris with Moot Green.
- Highlight the iris with Yriel Yellow, focusing on the lower part of the eye.
- Add a small white dot for the reflection.
Finishing Touches
- Review and Adjustments:
- Revisit any areas that need more contrast or smoother transitions.
- Ensure the highlights and shadows are consistent and realistic.
How to Build the Clawlord on Gnaw-Beast
How to Build a Clawlord on Gnawbeast
Want to make sure your Clawlord looks the best possible before you even start painting? Follow my step-by-step assembly video and guide.
If you don’t have an account here on my website, please sign up here! I have over 350 video tutorials with steps and tips, plus a selection of PDFs. If you are not sure about joining, you can explore my free videos with a free membership, or take the plunge and become a full subscriber for full access.


If you’d prefer to support me on Patreon, please visit: https://www.patreon.com/RichardGray