


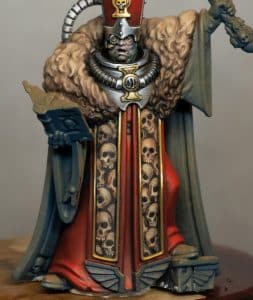
In this in-depth tutorial series on how to paint a Blood and Zeal Confessor, we explore every stage of bringing this grimdark preacher to life using rich tones, detailed brushwork, and careful light placement.
In Part One, we cover the initial airbrush setup using Soch Green and AK Cork to establish shadow and light direction, followed by painting the fluffy cloak with soft transitions and organic texture. We then move on to the non-metallic trim and chest details, a glowing red hat, and the pallid, bruised skin of the face. Techniques include loose brushwork, careful glazing, and using a mix of AK Interactive, Vallejo, and Games Workshop paints to achieve smooth, high-contrast results.
In Part Two, we focus on the intricate freehand work across the confessor’s robe tassels, featuring a full walkthrough on how to paint freehand skulls in miniature scale. You’ll learn how to sketch in your base shapes, build them up with layered bone tones, and add believable variation using light, shadow, and subtle brush marks. We also paint the surrounding red robes and non-metallic gold trim to frame the freehand work and tie it all together.
Whether you’re tackling this model for a Kill Team display or looking to push your freehand and material rendering, this series offers a clear, methodical approach with plenty of tips.
- Video: How to Paint a Blood and Zeal Confessor
- Paints & Materials Used
- Step-by-Step Guide
- Pro Tips
- Video: How to Paint a Blood and Zeal Confessor Part Two – Freehand Skulls, Robes and Trim
- Paints and Materials Used
- Step-by-Step Guide to the Freehand Skulls!
- Painting the Red Robes and Tassels
- Painting the Non-Metallic Gold Trim
- Pro Tips
Video: How to Paint a Blood and Zeal Confessor
Paints & Materials Used
Airbrush Stage:
- AK Soch Green
- AK Cork
Cloak Base & Highlights:
- Games Workshop Mournfang Brown
- Games Workshop Rhinox Hide
- Games Workshop Abaddon Black
- AK Morgas Bone
- AK Ice Yellow (or Vallejo Ice Yellow / similar)
Non-Metallic Trim & Tubing:
- Vallejo Neutral Grey
- Vallejo Sky Grey
- Pastel Blue (AK or equivalent)
- White (for final highlights)
Non-Metallic Gold:
- Games Workshop XV-88
- Two Thin Coats Dune Yellow
- Two Thin Coats Sand Yellow
- Ice Yellow or Pastel Yellow
- Games Workshop Mournfang Brown (for shadow details)
Face:
- Games Workshop Bugman’s Glow
- Pastel Blue
- AK Soch Green or AK Archaic Turquoise (for blue shading)
Hat and Red Cloth:
- AK Matte Red
- AK Deep Red
- AK Cadmium Red
- AK Burnt Red
Brushes:
- Artis Opus Size 4
- Size 00 and Size 0 for precision work
Step-by-Step Guide
Pre-Shading with the Airbrush
Start with the model assembled and primed. Use an airbrush to apply:
- AK Soch Green sprayed from below to simulate shadows.
- Then airbrush AK Cork as a zenithal highlight from above.
This underpainting will act as a guide for light placement on the cloak and face, and helps build contrast for your non-metallic metal (NMM) later on.
Blocking Non-Metallic Areas
Use AK Black thinned down with water (around 1:2 paint to water) to loosely wash over all areas intended for NMM:
- Mace
- Tubing
- Hat trim
- Chest details
This wash subtly darkens surfaces, enhancing later contrast without filling in recesses like Contrast paints do.
Painting the Fluffy Cloak
Start with Mournfang Brown, heavily thinned (about 1:1.5 paint to water). Use a large brush (Artis Opus Size 4) and drag the paint downwards toward shadow areas, leaving lighter areas around the upper shoulders and neck.
- Add Rhinox Hide in deeper recesses.
- Wet blend Mournfang Brown and Black into the base for richer shadows.
- Once dry, use AK Morgas Bone in a loose wet-brush or semi-drybrush manner to bring up texture.
- Introduce Ice Yellow for sharper highlights (especially effective for punchy warmth).
Glazing for Softness:
- Glaze with Mournfang Brown (4:1 water to paint) to soften transitions.
- Repeat with AK Cork over highlighted areas to unify tones and bring back fluffiness.
The cloak is sculpted with soft detail, so focus on slow transitions and avoid sharp contrasts.
Painting Non-Metallic Trim
Block in large highlight shapes with Vallejo Neutral Grey:
- Be generous—smaller areas will get eaten by later highlights.
Layer up:
- Neutral Grey
- 50/50 Neutral Grey + Sky Grey
- Sky Grey
- Sky Grey + Pastel Blue
- Pastel Blue
- Small touches of pure White for bright points
Use stippling, line work, and tiny marks to convey texture. For bounce light, glaze in AK Cork where fur reflects onto metal.
Painting the Face
Start with Bugman’s Glow, building it over the zenithal base.
- Mix Bugman’s Glow + Pastel Blue for highlights.
- For sharper highlights: increase Pastel Blue, or even use it pure (with care).
For shadows:
- Thin AK Archaic Turquoise or Soch Green to a glaze (5:1 water to paint).
- Apply subtly to lower cheeks and jawline recesses.
The cold blue tones contrast the warmth and give the Confessor a slightly sickly, dramatic look—perfect for grimdark flavour.
Painting the Red Hat and Robes
Block in all red areas using AK Matte Red.
Highlights:
- AK Deep Red for first pass
- Cadmium Red on forward-facing areas
- Keep left side (as viewed) darker—highlight only with Deep Red
Shadows:
- Use AK Burnt Red sparingly at the base and under folds
For blending:
- Glaze Cadmium Red with Deep Red to smooth transitions
- Use a Size 4 brush for long, smooth blends
- Drag or stipple with Matte Red or Burnt Red as needed
These are high-saturation reds, with minimal white or black added. Keep it punchy and rich.
Finishing Touches on the Trim & Symbols
Use the same NMM greys and yellows as before for:
- The Inquisition “I” symbols on the chest and hat
- Cable around the back of the head
Add extra Mournfang Brown marks to simulate reflections on the flat “I” symbols where sculpted detail is minimal.

Pro Tips
- Face placement matters: Your eye is naturally drawn here, so use fine dot highlights for lips, cheeks, and eyes.
- Avoid over-highlighting fur: It becomes too harsh and loses softness.
- Adjust bounce light colours to reflect nearby surfaces (e.g. cloak fur tone into hat trim).
- Test your colour jumps: On smaller surfaces, you can skip intermediate mixes for a faster finish.
- Use your lamp to guide highlight placement realistically, but tweak for scale.
How to Paint a Blood and Zeal Confessor – Part 2: Freehand Skulls, Robes & Trim
This is Part 2 in a series for how to paint the Priest from the Blood and Zeal Kill Team box that Games Workshop kindly sent me as an early review copy. This stage focuses on freehand painting the skull tassels, followed by the rich red fabric and non-metallic gold trim.
Video: How to Paint a Blood and Zeal Confessor Part Two – Freehand Skulls, Robes and Trim
Paints and Materials Used
From Games Workshop:
- Mournfang Brown
- Morghast Bone
- Ushabti Bone
- Screaming Skull
- Rhinox Hide
- XV-88
From AK Interactive:
- Cork
- Black
- Burnt Red
- Matt Red
- Deep Red
- Cadmium Red
- Sand Yellow
- Pastel Yellow
From Two Thin Coats:
- Dark Sun Yellow
Brushes:
- Artis Opus Size 4 (for large glazing and soft transitions)
- Artis Opus Size 00 (for freehand and edge detailing)
Step-by-Step Guide to the Freehand Skulls!
Start with a Flat Black Base
- Base the tassel area in AK Black to give you a blank slate.
- Mistakes are easy to correct by simply touching them up with more black—no colour-matching required.
Block in the Skull Shapes
- Roughly sketch out skull shapes using AK Cork.
- Avoid going too small—larger blobs give you more room to define facial features.
- Scatter some angled or partial skulls for interest and depth.
Layering Skull Highlights
- Use a mix of the following for highlights:
- Games Workshop Morghast Bone, Ushabti Bone, and (sparingly) Screaming Skull.
- You can also mix Cork + Morghast Bone to create a smoother midtone.
- Don’t worry about lower jaws—just the upper structure and cheekbones to keep it readable.
Add Depth with Shadows
- Use Mournfang Brown for mid-shadow tones and detailing.
- Deepen with Rhinox Hide in recessed areas.
- For small transitions, glaze with thinned Mournfang Brown or mix into Cork as needed.
Painting the Red Robes and Tassels
Base and Highlight the Reds
- Begin with AK Matt Red for midtones and highlight placement.
- Shadow the lower sections with AK Burnt Red.
- Highlight top edges and curves with AK Deep Red and a touch of AK Cadmium Red (tone back with Deep Red if needed).
Smooth the Transitions
- Create a glaze from Burnt Red (approx. 3:1 water to paint).
- Use a large brush like a Size 4 to glaze over the transitions quickly and evenly.
Painting the Non-Metallic Gold Trim
Build the Gold
- Base the entire trim in Games Workshop XV-88.
- Layer up highlights using:
- Two Thin Coats Dark Sun Yellow
- AK Sand Yellow
- Final accents with AK Pastel Yellow
Application Tips
- Paint the gold with soft, rounded transitions—it’s fabric trim, not shiny metal.
- Use black linework if needed to separate the trim from your freehand work.
- Be careful when painting close to your skulls—a clean edge makes all the difference.
Pro Tips
- Have a few ‘hero’ skulls. Make one or two full, detailed skulls to help the viewer instantly recognise the pattern.
- Be willing to repaint. The first skull in the video was completely redone because it threw off the balance—don’t be afraid to do the same.
- Use the zenithal highlight from Part 1. This helps guide your red robe shadows and light placement.
- Let it be asymmetric. Freehand doesn’t have to be perfect—variation adds visual interest and is much easier to paint.


If you don’t have an account here on my website, please sign up here! I have over 350 video tutorials with steps and tips, plus a selection of PDFs. If you are not sure about joining, you can explore my free videos with a free membership, or take the plunge and become a full subscriber for full access.


If you’d prefer to support me on Patreon, please visit: https://www.patreon.com/RichardGray