


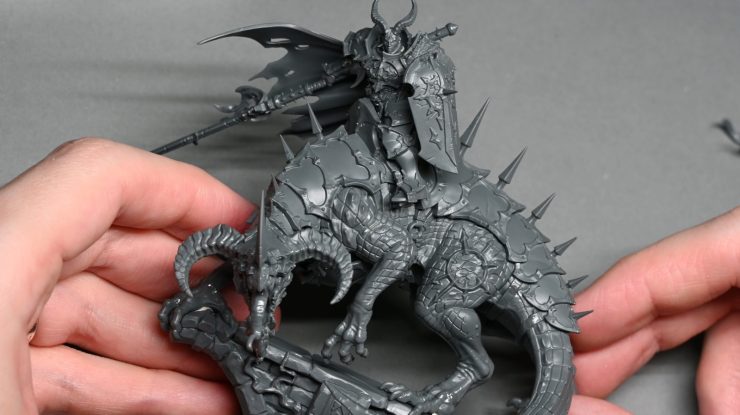
This video and step by step guide shows the whole process how to build Abraxia, building and cleaning up the new model from Games Workshop in preparation for painting. I go over lots of little tips and tricks to hide join lines, remove mould lines etc.
Video : How to Build Abraxia
Materials Needed
- Godhand Clippers
- Tamiya Extra Thin Cement
- Sprue Glue (a mix of Tamiya Extra Thin Cement and chopped-up sprues)
- Scalpel
- Tamiya Sanding Pad
Step 1: Preparation
Gather Your Tools and Materials: Ensure you have all the tools listed above.
Examine the Sprues: Familiarise yourself with the parts on the sprues. This will make it easier to find pieces as you go along.
Step 2: Clipping and Cleaning Parts
Clipping: Using the Godhand clippers, carefully clip the parts from the sprues. The clippers are extremely sharp, so apply gentle pressure to avoid breaking the blades.
Tip: Clip close to the part, but leave a small nub which can be cleaned off later to avoid stressing the plastic.
Cleaning Nubs: Use a scalpel to carefully trim the remaining nubs. Hold the blade at an angle and gently scrape towards yourself to remove excess plastic.
Tip: For safer handling, brace your thumb against the part while cutting, ensuring better control.
Step 3: Gluing and Assembling Sub-Assemblies
Legs and Body: Follow the instructions to glue parts 18, 23, and 24 together using Tamiya Extra Thin Cement. Apply the cement on the inside edges where parts join, allowing capillary action to pull the glue into the gaps.
Tip: Be cautious with the amount of glue to avoid fingerprints or excess glue marks.
Additional Parts: Continue assembling other parts such as the claws and tail using the same method. Fit the pieces together dry before gluing to ensure proper alignment.
Step 4: Detailed Cleaning and Assembly
Removing Mould Lines: Use a scalpel to carefully scrape off any mould lines on the model. For textured areas like horns or scales, scrape lightly to avoid removing detail.
Tip: Use the back of the blade for a gentler approach, similar to a mould line remover tool.
Smoothing Edges: Apply Tamiya Extra Thin Cement to smooth the edges after scraping. This will help melt any residual plastic bits, leaving a clean surface.
Step 5: Filling Gaps
Using Sprue Glue: For any visible gaps, apply sprue glue. It’s thicker than regular cement, filling gaps effectively.
Tip: After applying, use Tamiya Extra Thin Cement to smooth the filled areas, ensuring a seamless look.
Allow to Dry: Let the sprue glue dry overnight. This ensures it hardens properly before any sanding or additional work.
Step 6: Final Assembly
Main Body and Legs: Once the sprue glue has dried, sand any filled areas with a Tamiya sanding pad. The foam backing allows it to conform to the model’s shape, preventing flat spots.
Tip: Brush away any dust with a soft brush before proceeding.
Attaching Arms and Head: Glue the arms, head, and other remaining parts. Ensure the rider and dinosaur are assembled separately if you plan to paint them in sub-assemblies.
Step 7: Assembly for Painting
Sub-Assemblies: Keep parts like the head, shield, and cloak separate for easier painting. Use blue tack to hold pieces in place during dry fitting.
Testing Fit: Ensure the rider fits well on the dinosaur before gluing the final pieces.
Final Tips
Use Proper Lighting: Ensure your work area is well-lit to catch any small details or imperfections.
Handle with Care: Always handle parts gently to avoid breaking delicate pieces.
By following this guide, you’ll have a well-assembled and cleaned Abraxia model, ready for priming and painting. Good luck!
How to Build Abraxia PDF
Want this step-by-step guide as a downloadable PDF, with lots more tips, photos and instruction?
How to Build Abraxia PDF
This step by step PDF guide shows the whole process how to build Abraxia, building and cleaning up the new model from Games Workshop in preparation for painting. I go over lots of little tips and tricks to hide join lines, remove mould lines etc.

If you don’t have an account here on my website, please sign up here! I have over 350 video tutorials with steps and tips, plus a selection of PDFs. If you are not sure about joining, you can explore my free videos with a free membership, or take the plunge and become a full subscriber for full access.


If you’d prefer to support me on Patreon, please visit: https://www.patreon.com/RichardGray