


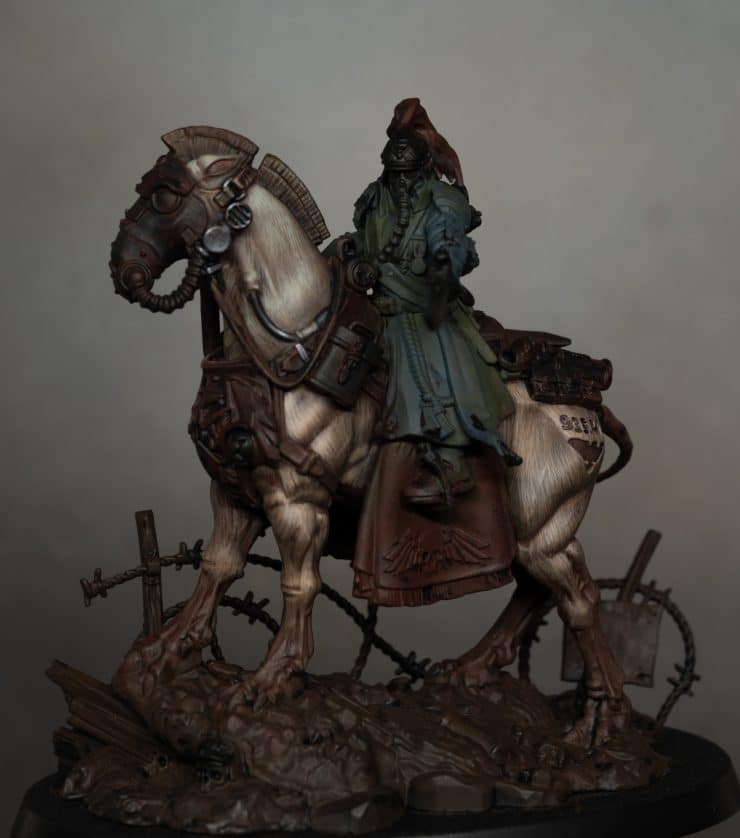
The Death Korps of Krieg Marshal is a striking centrepiece model, embodying the grim determination of the Astra Militarum’s most unyielding warriors. In this tutorial, I’ll take you through the base colour application and fur painting process for the Marshal’s horse, setting the foundation for the rest of the model and the wider Death Korps army.
This guide covers:
✅ Basecoating the uniform, horse, and equipment
✅ Blending colours for a realistic, weathered appearance
✅ Creating depth and texture in the horse’s fur
✅ Early non-metallic metal techniques for armour details
Whether you’re painting this model for the tabletop or aiming for a more refined display piece, this approach builds contrast and texture in a way that suits both gaming and showcase painting. The series will continue with detailed work on the Marshal himself, refining his uniform, non-metallic metal elements, and weathering effects.
Let’s get started!
Video: How to Paint a Death Korps of Krieg Marshal – Base Colours & Horse
Materials & Paints Used
The following AK 3rd Gen paints were used in this tutorial:
- Cork – Base colour for the horse’s fur and highlights.
- Camouflage Green – Adds depth and grime to the uniform and environment.
- Anthracite Grey – Base colour for the uniform.
- Black Red – Underlayer for the horse’s skin.
- Grey Green – Used for refining highlights and adding subtle tonal variation.
- Very Dark Brown – General shading and contrast.
- Dark Brown – Additional shading and texture depth.
- Black – Base for non-metallic metal areas, straps, and tubing.
- White – For final highlights and contrast points.
- Neutral Grey – Used in non-metallic metal detailing.
- Pale Grey – Lighter tones for fur and non-metallic metal highlights.
Brushes Used
- Artis Opus Size 4 – Main workhorse brush for basecoating, blending, and texture work.
- Artis Opus Size 00 – Used for fine detailing, non-metallic metal, and sharp fur highlights.
How to Paint a Death Korps of Krieg Marshal – Step-by-Step Painting Guide
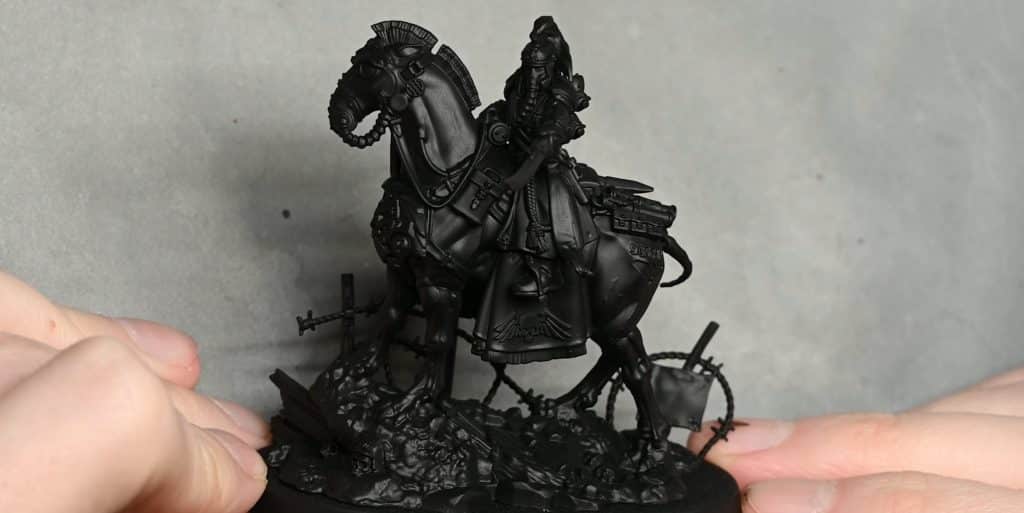
1. Priming the Model
- The model was primed black to establish a dark, moody foundation.
- Black primer is ideal for the gritty, grimy aesthetic of the Death Korps of Krieg.
2. Blocking in the Base Colours
At this stage, precision is not a priority—the focus is on quickly covering the model with foundational colours.
Basecoat the Uniform
- Use Anthracite Grey as the main uniform colour.
- Apply it loosely with a Size 4 brush, covering all uniformed areas.
- Don’t worry if some paint strays onto other areas—this will be refined later.
Basecoat the Horse’s Fur
- Start with a Black Red basecoat for the fur.
- Next, layer Cork over the top while the Black Red is still slightly wet. This helps create a natural transition between the shades.
- Expect the wet paint to look messy—it will settle into a more natural tone once dry.
- Avoid overworking wet paint, as it may lift and create patchy coverage.
Basecoat the Leather & Tubing
- Apply Black to the straps, tubing, and leatherwork.
- Some areas will remain black, while others will be highlighted or converted into non-metallic metal later.
- Use a loose approach here—these details will be refined as painting progresses.
Basecoat the Saddle & Cloth Details
- Use Black Red for saddle areas.
- Apply Camouflage Green sparingly across fabric areas to harmonise the colour palette and give it a weathered, natural feel.
- If paint pools in recesses, lightly wick it away with the brush to prevent blotchy coverage.
3. Refining the Fur & Skin
With the base layers down, the next step is to begin defining the textures and muscle structure of the horse.
Building Up the Fur
- Apply Cork in loose, directional strokes over the fur.
- The key here is to use a large brush but apply soft pressure to create organic transitions.
- Keep strokes in the natural direction of hair growth.
- Introduce Grey Green into the Cork to refine the tones.
- Focus on muscle areas and spots where the light naturally falls.
- Work in thin, layered strokes rather than full coverage.
- Use Very Dark Brown to reinforce the deeper shadows in the recesses.
- A thin glaze (4:1 water to paint) is useful here.
- Apply it in thin layers rather than heavily pooling it.
Creating a Smooth Fur Effect
- Instead of edge highlighting, build texture with controlled brush strokes.
- For a softer fur effect, keep layering Cork and Grey Green with gentle overlapping strokes.
- If the highlights feel too harsh, glaze over them with Dark Brown to soften transitions.
4. Establishing Contrast with the Black Areas
With the fur now taking shape, it’s time to reinforce the darker elements to improve contrast.
Painting the Straps & Leather
- Black areas need subtle variations to avoid looking flat.
- Mix Neutral Grey into Black for highlighting edges of straps and tubing.
- Apply selective thin highlights, rather than full edge highlighting, to keep it gritty.
Darkening the Horse’s Mane & Tail
- Using Dark Brown, apply a thin coat over the mane and tail.
- Follow up with Black, applied as a slightly diluted glaze, to darken recesses while keeping brown undertones.
- Don’t fully black out the mane—keeping brown visible adds realism.
5. Refining the Highlights & Non-Metallic Areas
Enhancing the Fur’s Contrast
- For the brightest fur highlights, mix Pale Grey into Cork.
- Apply carefully to muscle peaks and fur edges, avoiding over-brightening.
- Use short, fine strokes to emphasise individual hairs.
Non-Metallic Metal (NMM) Breathing Apparatus
- Apply Neutral Grey as a first highlight to all metallic black areas (e.g., tubing, mask).
- Use stippling and soft scratches to build up texture.
- Apply Pale Grey as a second highlight, keeping it focused on upward-facing edges.
- Finish with sharp white dots on extreme edges for the illusion of reflected light.
6. Final Touches & Adjustments
- Blending & Softening Highlights:
- If highlights look too harsh, glaze over with diluted Camouflage Green or Dark Brown to reintegrate them into the overall tones.
- This is particularly useful for smoothing fur transitions.
- Harmonising the Colour Palette:
- A thin Camouflage Green glaze over the uniform and saddle will subtly blend tones and unify the overall look.
- This prevents parts of the model from looking too isolated in tone.
- Last Pass on Fur Detailing:
- Add final strokes of Pale Grey on the highest points of the horse’s neck and joints.
- Ensure the fur follows natural muscle contours for realism.
Final Thoughts & Next Steps
At this stage, the model is starting to take shape, with the fur texture established and the base colours blocked in. The next steps will focus on:
- Painting the Marshal’s uniform details.
- Developing deeper shading and weathering.
- Refining the non-metallic metal effects.
- Adding finishing touches to the base and environmental details.
This project is just getting started, and I’ll be painting the entire Death Korps box over time—so stay tuned for more!
Thank you for following along, and I’ll see you in the next part!
Need some help building him?
How to Build the Krieg Marshal
This guide walks you through building the model, highlighting key tools, techniques, and best practices to ensure a clean and precise assembly.
More Krieg Tutorials? Oh, go on, then.


Videos Not Showing?
To view any of my paid tutorials, you need to be a member of the website – please click below to log in or join the site.


Not sure about joining just yet? Check out my Youtube for all my free tutorials or sign up as a free “friend” member on this site and visit the free videos page!
If you’d prefer to support me on Patreon, please visit: https://www.patreon.com/RichardGray