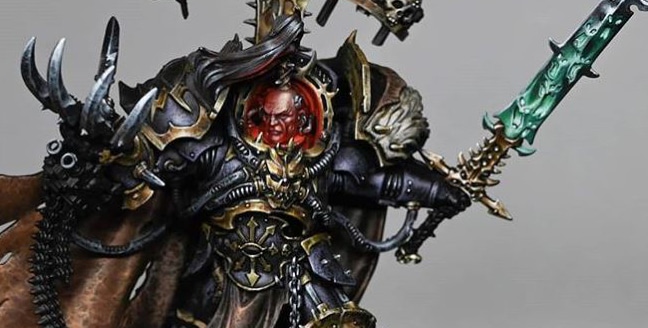
Learn how to paint red OSL in this video guide! A major focal point of Abaddon’s model is the red glow of chaos that he eminates. For this, I employed Object Source Lighting (OSL) techniques using Mephiston Red, Evil Sunz Scarlet, and Wild Rider Red. Carefully layering these reds over Bugman’s Glow and Kislev Flesh creates a subtle yet intense glow that adds a sense of malevolence to Abaddon’s visage.
Video – How to Paint Red OSL
Paints needed
- Paints:
- Games Workshop: Bugman’s Glow, Cadian Fleshtone, Kislev Flesh, Ushabti Bone, Mephiston Red, Evil Sunz Scarlet, Wild Rider Red, Abaddon Black, Rhinox Hide
- P3: Morrow White
Painting the Head
- Base Coating:
- Start by applying a base coat of Bugman’s Glow to Abaddon’s head. The paint should be thinned to ensure translucency, allowing the black primer to show through slightly. This helps to build up the layers gradually and control the lighting effect.
- Layering the Skin:
- Apply multiple thin layers of Bugman’s Glow to build up the opacity on the areas where light would naturally hit, such as the forehead, cheeks, and chin. Avoid the recessed areas under the eyebrows and the lower parts of the face to maintain shadow.
- Adding Shadows:
- Use Abaddon Black thinned down with water (around 6:1 ratio) to glaze the lower parts of the face, such as under the cheeks, eyebrows, and chin. This creates a strong contrast and enhances the lighting effect.
- Highlighting the Skin:
- Begin highlighting the skin with Cadian Fleshtone, focusing on the higher points like the forehead, nose, and upper cheeks. Apply the paint in thin, controlled strokes to create smooth transitions.
- Follow with Kislev Flesh for the next level of highlights. Concentrate on the most prominent areas, keeping the highlights small and precise.
- Final Highlights:
- Use Ushabti Bone mixed with Kislev Flesh for the highest highlights. Apply sparingly to the brightest areas, such as the forehead and the tops of the cheeks.
- For the ultimate highlight, add a small amount of P3 Morrow White to the Ushabti Bone mix and apply tiny dots to the highest points. This adds a final touch of brightness.
Creating the Red OSL Effect
- Base Red Glow:
- Apply Mephiston Red to the areas where the red glow will be the strongest, such as the underside of the chin, lower cheeks, and under the eyebrows. The paint should be thinned and applied in layers to build up the intensity gradually.
- Enhancing the Glow:
- Use Evil Sunz Scarlet to intensify the red glow. Focus on the areas closest to the light source, such as the lower part of the face and the underside of the chin. Blend the edges smoothly into the Mephiston Red.
- Highlighting the Red:
- Add Wild Rider Red to the mix for the highlights within the red areas. Apply this to the recesses where the light would be most intense, such as the underside of the chin and the lower edges of the cheeks.
- Balancing the Glow:
- Occasionally switch back to Bugman’s Glow to refine the flesh highlights and balance them with the red glow. This ensures a seamless transition between the skin tones and the red lighting effect.
Refining and Detailing
- Refining Shadows:
- Use Rhinox Hide thinned down (around 7:1 ratio) to glaze the deepest recesses and enhance the shadows. Apply this carefully to avoid overpowering the existing layers.
- Detailing the Eyes:
- Paint the eyes black with Abaddon Black. Add a small white dot with P3 Morrow White to create a catchlight, giving the eyes a lifelike appearance.
- Red Glows on Armour:
- With the armour in place, use Mephiston Red and Evil Sunz Scarlet to add red highlights to the insides of the armour around the neck and any other areas that would catch the glow. This helps to integrate the head with the rest of the model.
There are lots more tutorials for painting Abaddon! Follow the link below to watch them all, or scroll town to explore them by model part.

Abaddon the Despoiler
A series of videos on how to paint Abbadon the Despoiler to competition standard – (new step-by-step guides included!)
Videos Not Showing?
To view any of my paid tutorials, you need to be a member of the website – please click below to log in or join the site.
Not sure about joining just yet? Check out my Youtube for all my free tutorials or sign up as a free “friend” member on this site and visit the free videos page!
If you’d prefer to support me on Patreon, please visit: https://www.patreon.com/RichardGray


