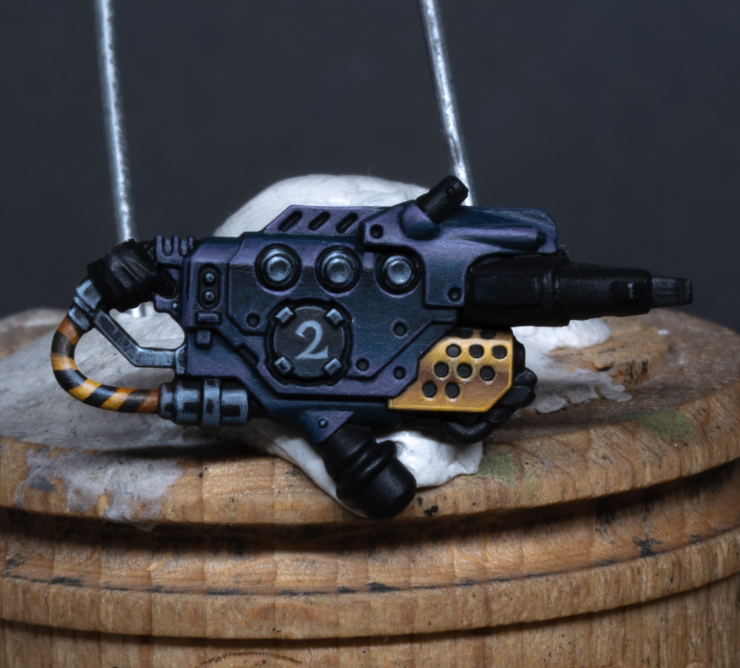
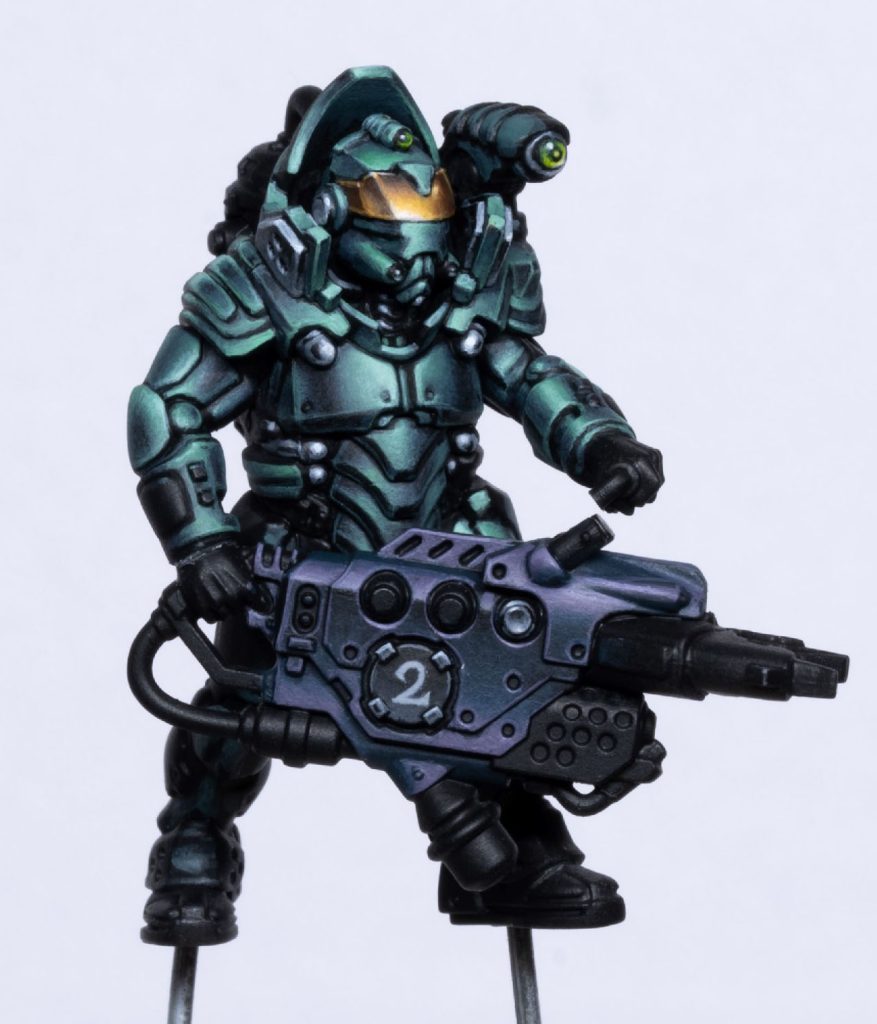
Welcome to my guide on how to paint the Van Saar Heavy Weapon from the Hive Secundus box set. This video tutorial along with step-by-step guide will help you achieve a high tabletop standard, with lots of the techniques interchangeable for your other models’ weapons, too!
Video : How to Paint the Van Saar Heavy Weapon
Materials and Paints Needed
Paints
- Games Workshop:
- Incubi Darkness
- Daemonette Hide
- Abaddon Black
- P3:
- Morrow White
- Vallejo:
- Model Colour Black
Brushes
- Artist Opus Size 1 brush
- Artist Opus Size 00 brush
Other Tools
- Scalpel or hobby knife (for cutting the weapon if needed)
- Wet palette
Preparation
Weapon Removal:
- If the weapon is already attached, carefully cut it off using a scalpel or hobby knife before painting. This makes painting the back of the weapon and armour panels easier.
How to Paint the Van Saar Heavy Weapon
Base Colour
Incubi Darkness:
- Apply Incubi Darkness as the base colour for the weapon. This dark colour provides a good foundation for highlights and shading.
Highlighting
Daemonette Hide:
- Use Daemonette Hide for the first stage of highlighting. Apply it to the curved and flat surfaces of the gun, focusing on the areas that will catch the most light.
- For curved sections, take the highlight down further to create a smooth transition.
- For flat sections, add a light-dark-light modulation to create interest and depth.
Blending Highlights
Incubi Darkness:
- Thin Incubi Darkness to a 50/50 paint-to-water ratio for initial blending. Apply this over the transition points to smooth out the highlights.
- For final blending, thin Incubi Darkness further (3-4 parts water to 1 part paint) and glaze over the highlights to achieve a smooth finish.
Edge Highlights
Daemonette Hide:
- Edge highlight the entire weapon with Daemonette Hide. This step sharpens the edges and gives definition to the weapon.
Daemonette Hide and Morrow White:
- Mix Daemonette Hide with Morrow White for a second stage of highlighting. Apply this mix to the upper edges and prominent features.
- Continue adding white to the mix for successive highlights, but avoid taking any highlights up to pure white to maintain contrast with non-metallic areas.
Painting the Number ‘2’
Base Colour
Light Grey:
- Use a light grey mix (lighter than neutral grey) for the number ‘2’. This base colour should be off-white to avoid competing with the highlights on the weapon.
- If the paint has dried and been rehydrated multiple times, consider mixing fresh paint to ensure a clean, opaque finish.
Detailing the Number
Vallejo Model Colour Black:
- Use black paint to tidy up the edges and refine the shape of the number ‘2’. This will create sharp, clean lines and enhance the appearance of the freehand work.
- If needed, go back and forth between the grey and black to perfect the edges.
Additional Details
Non-Metallic Metal (NMM) Sections
Neutral Grey to White:
- For non-metallic metal parts, start with a mid-grey base and progressively add white for highlights.
- Focus on creating strong light transitions and edge highlights to simulate a metallic finish.
- Add a final white dot highlight on the sharpest edges for a polished look.
Video : How to Paint the Van Saar Heavy Weapon Part Two
Materials and Paints Needed:
- Paints:
- Games Workshop: Mournfang Brown, Rhinox Hide
- Two Thin Coats: Dark Sun Yellow
- P3: Morrow White
- Brushes:
- Detail brush for fine lines and highlights
- A larger brush for base coating
- Additional Tools:
- Wet palette to keep your paints moist and workable
- Scalpel for tidying up any imperfections
- Kitchen roll or tissue for removing excess paint from the brush.
Step by Step – How to Paint the Van Saar Heavy Weapon (Gold and Hazard Stripes)
Preparing the Base Colour
Mixing the Base Colour: Begin by creating a 50/50 mix of Mournfang Brown and Dark Sun Yellow. This mix serves as the base colour for the NMM gold effect on the flamer cover.
Applying the Base Colour: Apply the mixture in two to three thin coats to achieve an even, opaque layer. Ensure the paint is thinned slightly to avoid texture build-up, which can cause a lumpy finish. If the paint still feels thick, consider switching to a different yellow, such as Balor Brown, for a smoother finish.
Building the NMM Gold Effect
Highlighting with Dark Sun Yellow: Once the base colour is dry, use Dark Sun Yellow on its own to add highlights. Focus on the curved areas of the flamer cover, especially the top curve where the three circles are located. These areas should have the most intense highlights to mimic light catching on the metal.
Creating a Transition: Paint a line of Mournfang Brown straight through the middle of the highlighted area. This will serve as the midpoint of the transition between the dark and light areas.
Blending the Transition: Carefully blend the Dark Sun Yellow into the Mournfang Brown by using thin layers and controlled brush strokes. If needed, create intermediary shades by mixing Dark Sun Yellow with Mournfang Brown in varying ratios to help smooth the transition.
Adding the Brightest Highlights: Mix Dark Sun Yellow with P3 Morrow White to create a lighter highlight. Apply this to the top curve of the flamer cover, just above the three circles, where the light would be most intense. You can also use Vallejo Ice Yellow or Dawn Yellow if you prefer a pre-mixed highlight.
Final Highlights with Pure White: For the final highlight, use P3 Morrow White directly on the brightest parts of the flamer cover, such as the top curve. This will enhance the NMM effect, making these areas appear as the shiniest and most reflective parts of the metal.
Adding Hazard Stripes
Base Colour for Hazard Stripes: Cover the entire cable with a solid layer of Dark Sun Yellow. Apply multiple thin coats to achieve an even coverage, avoiding any lumps or texture build-up.
Marking the Hazard Stripes: Use a fine detail brush and thinned black paint (Abaddon Black is suitable) to paint the hazard stripes. Start from the bottom of the cable and work upwards, being mindful of the curvature. As the cable curves, adjust the spacing of the stripes to account for the distortion of the material—stripes on the inner curve will be closer together, while those on the outer curve will be more spaced out.
Highlighting the Hazard Stripes: Once the black stripes are in place, mix grey by adding white to black for the black stripes’ highlights. For the yellow stripes, use the Dark Sun Yellow mixed with P3 Morrow White to create highlights. Apply these highlights along the edges of the stripes to give them dimension.
Smoothing the Highlights: If your highlights appear too stark, soften them by glazing. Create a glaze by thinning down Mournfang Brown and Rhinox Hide with water (approximately 4 parts water to 1 part paint). Lightly apply the glaze to the areas where the highlights meet the base colour, building up the layers gradually until you achieve a smooth transition.
Refining the Hazard Stripes: Use a combination of stippling, glazing, and careful brush strokes to refine the hazard stripes, ensuring they look crisp and well-blended. If necessary, go back and touch up any areas where the black and yellow meet, using the original colours to clean up any mistakes.
Final Touches
Glazing the Connecting Points: To add depth to the connecting points of the cable, apply a glaze of Mournfang Brown, followed by a glaze of Rhinox Hide. Start a few millimetres away from the connection and glaze towards it, building up the intensity near the connection. This will create a smooth gradient and enhance the overall appearance of the hazard stripes.
Review and Adjustments: Revisit any areas that need more contrast or smoother transitions. Ensure the highlights and shadows are consistent and realistic.
Final Assembly: Attach any additional pieces, such as the weapon or other parts, if not already in place.
Sealing: Apply a matte varnish to protect your work.
By following these steps, you’ll have a beautifully painted Van Saar Heavy Weapon that stands out on the tabletop. Enjoy the process and take your time to achieve the best results!
More Van Saar Tutorials!
How to Paint a Van Saar Heavy from the Necromunda Hive Secundus set
In this tutorial we look at How to Paint a Van Saar Heavy from the Necromunda Hive Secundus set, with a detailed video guide and step by step instruction and tips!
If you don’t have an account here on my website, please sign up here! I have over 350 video tutorials with steps and tips, plus a selection of PDFs. If you are not sure about joining, you can explore my free videos with a free membership, or take the plunge and become a full subscriber for full access.
If you’d prefer to support me on Patreon, please visit: https://www.patreon.com/RichardGray
