


Welcome to my step-by-step video and guide for how to assemble the Clawlord on Gnawbeast from Skaventide. This guide will take you through the process of building, cleaning, and preparing your model to a high standard, suitable for both army painting and display level.
Video: How to Assemble the Clawlord on Gnawbeast from Skaventide
Tools and Materials Required:
- Clawlord on Gnawbeast from Skaventide model kit
- Scalpel or hobby knife
- Tamiya Extra Thin Cement (Note: make sure you use this in a well-ventilated space)
- Sprue Goo
- Sprue (excess plastic from the model)
- Sandpaper or sanding sticks
How to Assemble the Clawlord on Gnawbeast from Skaventide – Step-by-Step Instructions:
Step 1: Preparing the Pieces
Unbox and Inspect: Start by unboxing your Clawlord on Gnawbeast model. Inspect all pieces to ensure nothing is missing or damaged.
Cutting from Sprue: Using a scalpel, carefully cut each piece from the sprue. Cut towards yourself for better control, but be cautious to avoid injury. The scalpel should be sharp, requiring only light pressure to make clean cuts.
Step 2: Cleaning the Pieces
Remove Nubs: After cutting the pieces from the sprue, remove any leftover nubs. Use the scalpel to trim them off smoothly.
Mold Line Removal: Check each piece for mold lines and gently scrape them off with the scalpel. For better control, hold the piece firmly and scrape along the line until it’s smooth.
Step 3: Assembling the Model
Dry Fit: Before gluing, dry fit the pieces together to understand how they connect. This helps identify potential gaps and ensures a precise fit.
Cutting Push Fit Rods: For a cleaner assembly, cut off all the push fit rods from the model pieces. This allows the parts to butt together neatly without leaving gaps,
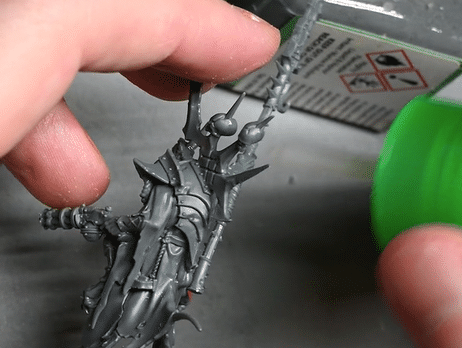
Gluing: Apply Tamiya Extra Thin Cement to the edges of the pieces where they will join. The glue’s capillary action will pull it into the seams, creating a strong bond.
Joining: Press the parts together carefully. The extra thin cement will quickly bond the pieces, so ensure they are aligned correctly.
Step 4: Filling Gaps
Make Sprue Goo: Create a gap-filling material called “sprue goo” by dissolving sprue pieces in Tamiya Extra Thin Cement. This mixture should be thick and left overnight to achieve the right consistency.
Applying Sprue Goo: Use a brush to apply the sprue goo to any visible gaps or join lines. Be generous, as it will shrink slightly as it dries.
Smoothing: Use a separate brush dipped in Tamiya Extra Thin Cement to smooth out the sprue goo. This helps it blend seamlessly into the model surface.
Step 5: Final Touches
Drying Time: Allow the glued and filled model to dry overnight. This ensures all bonds and fills are fully set.
Sanding: Once dry, use sandpaper or sanding sticks to smooth any rough areas, particularly where sprue goo was applied. This step is crucial for a professional finish.
Subassemblies: If painting in subassemblies, decide which parts need to be separate for easier access. Typically, arms, weapons, and detailed sections can be left off and painted separately.
Step 6: Painting Preparation
Inspection: Inspect the entire model for any missed mold lines, gaps, or rough spots. Address these issues before priming and painting.
Priming: Once satisfied with the assembly, prime the model with a suitable primer to prepare for painting.
About the Clawlord on Gnawbeast
As rulers of the Clans Verminus, Clawlords command the vast tides of Skaven soldiery that form the bulk of the Great Horned Rat’s armies. They have earned their positions through copious amounts of violence and a knack for scheming. Displaying far more valour and skill than typical Skaven, some Clawlords earn the privilege of riding into battle atop horrifying Gnaw-beasts. These mutated vermin have hyperactive metabolisms that force them into constant feeding frenzies, making them fearsome mounts in battle.
Learn how to paint the Clawlord on Gnawbeast
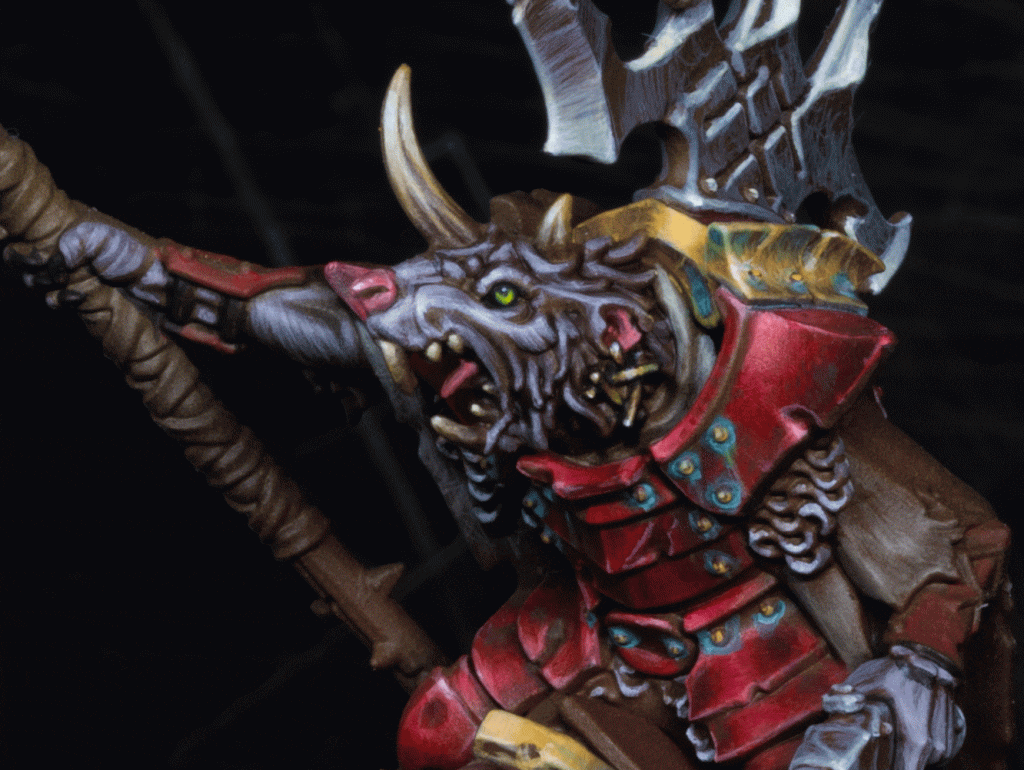
How to Paint a Clawlord on Gnawbeast
In these videos, we delve into how to expertly apply base coats, create dynamic highlights, and achieve stunning texture effects on the the Clawlord on Gnawbeast from the Skaventide box set.
If you don’t have an account here on my website, please sign up here! I have over 350 video tutorials with steps and tips, plus a selection of PDFs. If you are not sure about joining, you can explore my free videos with a free membership, or take the plunge and become a full subscriber for full access.


If you’d prefer to support me on Patreon, please visit: https://www.patreon.com/RichardGray